

We rounded a corner to see light beaming through the narrow canyon opening, casting an ethereal glow on the water. I knew then that we were looking at one of the most spectacular swimming spots in the Blue Mountains. It was spellbinding.
The walk to reach the canyon is also gorgeous with some narrow constrictions, small cascades and picturesque overhangs.
Accessing the canyon doesn’t require abseiling and if you take the right route it’s relatively easy, though you’ll still face some rough terrain, which we’ll go into in detail in the trail notes below.

The walk to Dalpura Canyon
The stats
Distance: 6.1km return, or a 5.3km circuit
Elevation: 275m
Difficulty: Moderate
Summary: There are two ways to access Dalpura Canyon and one route is significantly easier than the other. We completed the circuit, but we recommend taking the easier route both ways because it was far more scenic, had less chance of slipping and was only 800m longer.
Return or circuit?
We’d recommend the circuit only if you don’t mind some short, but steep slippery sections, or you much prefer a circuit to a return route.
The easier route still requires wading through water, which can be up to shoulder height, climbing up log jams and small cascades, and a couple of steep downhill sections where care should be taken. Despite this, much of the route is easy.
The harder route involves negotiating one steep hill on loose soil, traversing an exposed overhang and a lot more in the way of slippery rocks.
If you want to complete the circuit, we highly recommend going anticlockwise because the harder route is best walked up, rather than downhill.

Starting the trail: along the ridge
The trail begins on the southern side of the parking area - walking parallel to the highway in the Bilpin/Mount Tomah direction (coordinates: -33.5289704, 150.3093428).
After 50m you will see two paths, take the orange gravel track - slightly uphill to the right - not the path that takes a sharp right turn. After 70m you will arrive at a gate and pass around the side of it.


The trail is mainly level and very easy underfoot. It will soon begin to narrow and head out onto a ridge with some distant mountain views, before entering the bush 650m in.
At roughly the 900m mark the trail will begin descending, but it’s a good dirt path and it’s not steep.

After just over 1km you’ll emerge from the bush and start to get some fantastic views of the mountains. The narrow dirt track between the low scrub makes for very easy walking and the views are unobstructed.

Approximately 1.25km into the trail you’ll come to a pagoda and the views are again stunning, especially with the pagodas dotted between the mountain peaks.


The descent continues
From the first (and main) pagoda you need to look for the trail to the left of it. It heads around the base of the pagoda and curves right (west). It may not be immediately obvious on first glance, however, when you know to look out for it, you can’t miss it.

Follow this path around the pagoda and beyond for 100m and you will come to a steep pagoda you need to climb down.
The rock is very grippy when dry, and there are little grooves in the rock which you can use to descend easily.

Go carefully if the rock is wet. The path continues right at the base of the pagoda and reaches a fork 100m later. Take the left path into the bush. The track descends a little more steeply, but it’s still easy enough as the track is in very good condition.
After 150m you will begin walking beside a rock wall and the bush is quite dense, offering shade if you’re walking on a hot day. You will pass some tree fall across the track, but it’s easy to manoeuvre around.

At the 2km mark you need to look for the trail on the left, leaving the rock wall behind.
The next 350m of the descent are much steeper, and the path is a little dusty and slippery. This is the only bit of the descent where I was very mindful of footing.


Roughly 300m into it you need to take the path branching off to the left and from here it is less steep. You’ll see the canyon walls ahead and as the track bends left there are a couple of steps on a narrow eroded section of track - but literally only a couple of steps.
After this you enter the start of the canyon which marks the end of the descent.

Entering the canyon
You will now enter the shady canyon and the temperature noticeably drops. The first section of canyon has pathways which are dry, so you have a little longer before the inevitable wet boots. Even this early part of the canyon is really pretty, though it’s more open than what’s soon to come.

The path begins on the left side of the creek before the canyon walls begin to narrow and you’ll cross over to the right side. Approximately 200m after you entered the start of the canyon you’ll come to the wet section (this is just over 2.5km from the parking area).

Unless there has been significant rainfall (please see the safety notes at the end of the post about rain levels in the canyon) the water here will be very shallow, for us it started at ankle deep before a very short section was over knee height.

The creek bottom is sandy so it’s really easy to walk on. After 50m you’ll enter the first narrow section of canyon and though it’s very short, it’s when it really starts to feel like a slot canyon adventure!


Wading through the canyon
Just 20m after entering the first constriction you’ll reach a log jam. You need to climb up and over the logs. They were sturdy on our visit, but test them before putting all your weight on as some may weaken over time.
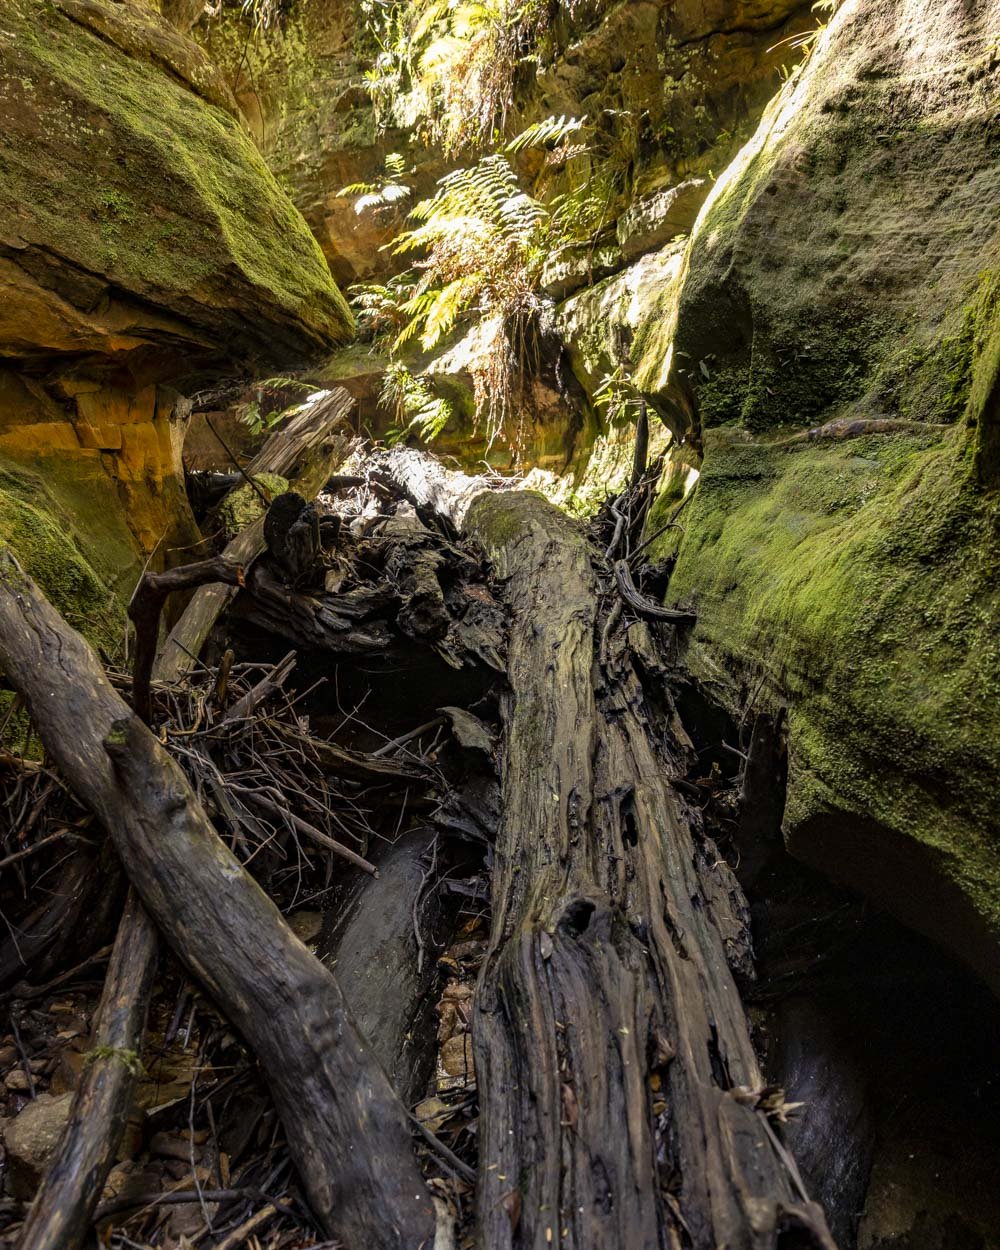
The logs were soaking wet but surprisingly weren’t slippery and climbing up them was easy. Just watch out for webs if you’re visiting early in the day!

After the logs you’ll enter a particularly picturesque section, with the sculpted canyon walls creating an almost tunnel like effect.
The water is very shallow here, but that’s about to change.

The canyon walls will widen again and there are a few more logs to climb over, but very easy ones. Roughly 70m later you’ll reach the first deep pool.
It’s only tiny and incredibly pretty with crystal clear water and lots of ferns, but you can expect to get wet up to your waist here.


There’s a second even lovelier pool just beyond, with mossy walls that were very Lord of the Rings-esque. The pool gets deeper just at the end where you need to climb up a cascade.

The cascade is quite easy to climb up, but the second foot placement requires a bit of a leg stretch, or it did for me anyway!
You’ll then have 30m in another stunning ferny mossy section before you need to climb up a second cascade. This one is easier, though take care on both as the rock is inevitably wet and could be slippery.


Reaching the waterfall
The water is shallow through the next stretch and it’s very easy going. Just 20m from the second cascade climb you’ll see a slender waterfall to your left.
Following this is a really cool opening between the cliff walls which was very photogenic, with golden light illuminating the rocks and water beyond.

From here the path continues uphill towards a more open section of canyon. You’ll need to cross one big sturdy log or climb a few rocks to continue - the log was not slippery on our visit, so I found that the easiest route. Look out for the amazing octopus tree on the right side of the cliff wall as you climb up.


Continuing up the creek requires walking on a dirt track and over some rocks, but they aren’t large and it’s straightforward. You’re now only 100m from the canyon waterfall.
You’ll pass through another pretty gap in the canyon walls, which is curved, almost like an arch and then you’ll walk into a huge overhang.


After passing through the overhang, you’ll round a corner to see the waterfall.

Wild swimming at Dalpura Canyon
Dalpura Canyon is spellbinding. With luminous green water and a shaft of light casting an ethereal glow, it looks otherworldly. I have never seen water colour quite like it.
Just when I thought it couldn’t get any better, we were lucky enough to experience a few light rays. Not all places live up to the hype, but Dalpura Canyon is not one of them.

Swimming here was a real wow factor moment for me and though the pool is not large, it’s deep and rock free through the middle, allowing for a proper swim.
The water is relatively cold by most people’s standards, but I actually found it to be perfect. Refreshing rather than freezing - though our visit was in summer!


Accessing the pool is easy as you can just walk right into the shallow water and then it quickly becomes deep enough to swim. You can sit on the narrow ledges to the right of the pool if you need a break from the water.

It’s worth noting if you’re keen to see Dalpura at its most magnificent, you do need a sunny day and it’s best to visit during the middle of the day when sunlight penetrates the chasm. It will still be spectacular in other conditions, though you won’t get that otherworldly glow.

Completing the circuit
As mentioned in the summary, we’d recommend for most people to simply retrace their steps after visiting the waterfall, and that’s what we would do next time. However, if you want to do the circuit we’ll cover what to expect.
To find the exit route you need to walk from the waterfall back to the overhang and cross the creek (to the southern side, the water will be on your right if you face downstream). Just 70m from the waterfall you’ll see a very steep dirt path leading uphill.


This is your exit track and some of the dirt is loose, so go carefully and use the trees to steady yourself if needed (this section is the main reason I would recommend doing the circuit anticlockwise as I feel like descending this path is a high slip risk).

After 80m you will reach a junction of sorts. The nicer looking path appears to continue heading uphill to the right.
The correct route is left/straight ahead, along the narrow path beside the sloping rock on the right. It is narrow and though not slippery (when dry) does have exposure to the left, so go carefully.

It will lead to an overhang. This too is highly exposed and a fall here would be dire, so go very carefully. The rock has a fine covering of sand, but was actually not as slippery as I expected when I looked at it - but treat it like it is.
Cross this overhang and descend down the tiered ledges to re-join the dirt track. You’ll see the red abseil anchor from here.


Continue through the bush and cross the creek, which is straight ahead (continuing upstream). You will come to a steep gully that leads away from the creek on the left.
Climb up the gully - again fine when dry, but potentially slippery when wet - and you will come to some boulders.


Climb up and over the boulders, which is quite easy and then bear right at the top. There is a beaten path running parallel to the creek.
From here it gets prettier with some nice overhangs and narrower canyon walls. You’ll then need to wade through the creek again (just over 400m into exit track) but it’s relatively shallow and it’s easy. You’ll pass a small waterfall and briefly exit the creek.

Roughly 40m later you’ll enter the most beautiful part of the exit track, with a narrow constriction and a small pool with cascade. This one is tiny, but very deep, so you could take another plunge if you wanted to!

The track continues to the right of the falls and is a little steep in places. There are footholds climbing out the creek which makes it easy, but after traversing you need to climb back down to the creek again.

This is down a slippery bit of rock and necessitates a bit of a leg stretch. You’ll then re-enter the creek for the final wade! It’s mainly shallow, though there is one deeper pool which had water above the waist on our visit.
Just 50m beyond this deeper pool, the creek will open out and you’ll see the path leading out of the water on the right.

It’s a little scramble up, but easy. It’s all a normal dirt path from here, first on a relatively level track through the bush before it begins to climb 500m later. It’s quite steep but the good track means it’s straightforward.
After a 300m steepish climb you’ll reach a pylon and the road. To get back to your car you need to head left for 750m along the side of the highway - a disappointing end to a truly awe inspiring walk.


Keep them wild
Please remember to take all rubbish with you and keep these places wild and pristine - as with anywhere in the outdoors. It’s important to leave them exactly as you found them so they will remain beautiful for generations to come.
Litter tends to breed litter, so if you do spot any and are able to pick it up and dispose of it outside the area, it will go a long way to keeping the area clean.
Canyon safety
Canyons can be dangerous environments in the wrong conditions. Never enter a canyon if it’s raining or rain is predicted as flash flooding is a real risk and it can happen very quickly.
There is limited to no phone signal around Dalpura Canyon, so it’s advisable to carry a PLB incase of emergency. We carry a GME personal locator beacon, which has the added benefit of working globally. You can check this one and others on Amazon.
Parking for Dalpura Canyon
There is no official car park for Dalpura Canyon, but there is a large lay-by with room for several cars to pull fully off the road. If you’re using the route we detail above you need to park at these coordinates: -33.5289704, 150.3093428
The lay-by is located 30km from Katoomba (30 minutes) and 120km from Sydney (1 hour 45 minutes).
This post may contain affiliate links, meaning at no additional cost to you, that we will earn a small commission if you click through and decide to make a purchase. This helps towards the costs of running our website. Thanks for your support.


