Yosemite is one of the best places for hiking in the world. This huge national park has it all from short easy strolls, to multi-day epics. We spent over a week exploring many of the best hikes in Yosemite so we can give you the full lowdown on where it’s best to spend your time.
This guide will also include some of the best viewpoints and must-see spots so you don’t miss any of the highlights.
Day one: The icons of Yosemite
AM - Around the valley
It’s worth making an early start as Yosemite is quite a distance from anywhere! Once you’ve made it to the outskirts of the park, head towards the valley floor.
Take in the iconic entry view
The first thing you see upon arriving at Yosemite is a view of the spectacular El Capitan. As soon as you drive in and the trees clear, you’ll see the huge cliff face of El Cap across the meadow.
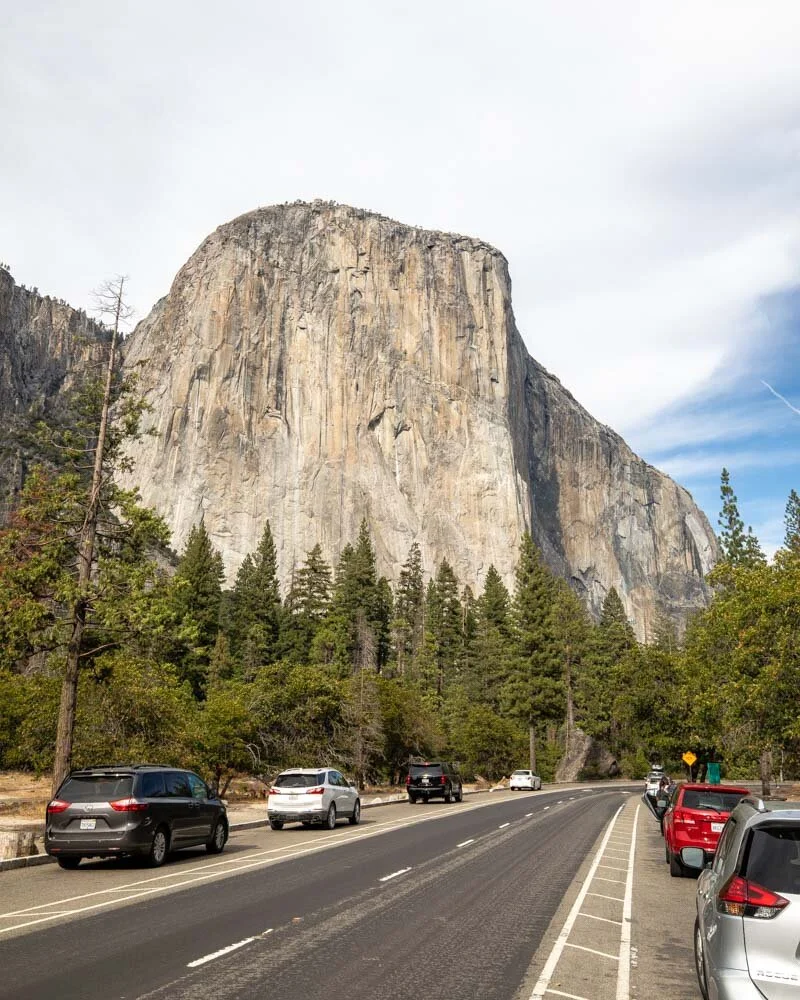
This will be your first view of the mighty El Capitan
We highly recommend pulling over and seeing if you can spot one of the many rock climbers trying to scale this world famous rockface. If you have a zoom lens on your camera or binoculars, it shouldn’t take you long to spot them!
As time is tight this is also a good spot to see Bridal Veil Falls, you can only see it from a distance here but it is still very impressive. To get up close is only a half a mile walk but it’s on a short time schedule it probably isn’t worth it.

Bridal Veil Falls, this was in fall, it would be much more powerful in spring or summer
The Mist Trail
We’d recommend the Mist Trail as your valley hike for the day unless you have Half Dome permits in which case you will be hiking it as part of your route to the summit. A good alternative could be the North Dome hike off the Tioga Pass Road which will show you another part of the park and give you a fabulous view of Half Dome to get you psyched up for the following days hike.
Whilst the Mist Trail is at its most dramatic in spring - when the waterfalls are so powerful that you are guaranteed to end up drenched - we still loved this trail in fall when the falls were at their most diminished.

Vernal Falls on the Mist Trail in fall
It’s a fairly steep trail much of the way but the payoff is big. You’ll see the stunning Vernal Falls, from the base and from above. You’ll also see Nevada Falls which are also really impressive. Views from the trail are just beautiful and worth every last one of those stairs!
The Mist Trail is 5.4 miles return with an elevation gain of 1925ft, if you don’t mind adding on an extra mile and a half we’d recommend taking the John Muir Trail down from Nevada Falls to give you a fantastic loop trail.
You’ll get differing views and a less steep descent on the JM Trail, which is kinder to your knees than the Mist Trail. The only downside to the John Muir is that on much of the track there is a fine layer of sand which I found to be quite slippery.

Views along the John Muir Trail
PM - Glacier Point Road
After taking in the valley floor, it’s time to see one of Yosemite’s most famous areas - Glacier Point. Most visitors miss out on the best of this area, choosing simply to go to the lookout and head back. But that’s missing the best part!
Tunnel View
On the way to Glacier Point, stop by Tunnel View for Yosemite’s most famous lookout, it looks just like a postcard. It is best to avoid the morning here as the sun creates quite a glare and can spoil your photos. It is a great late afternoon or sunset view, but we’ve saved a truly special spot for that, so the afternoon will suffice for this itinerary!
Tunnel View is a drive up lookout so there’s no walking required for this one.

All of Yosemite’s icons can be seen from Tunnel View
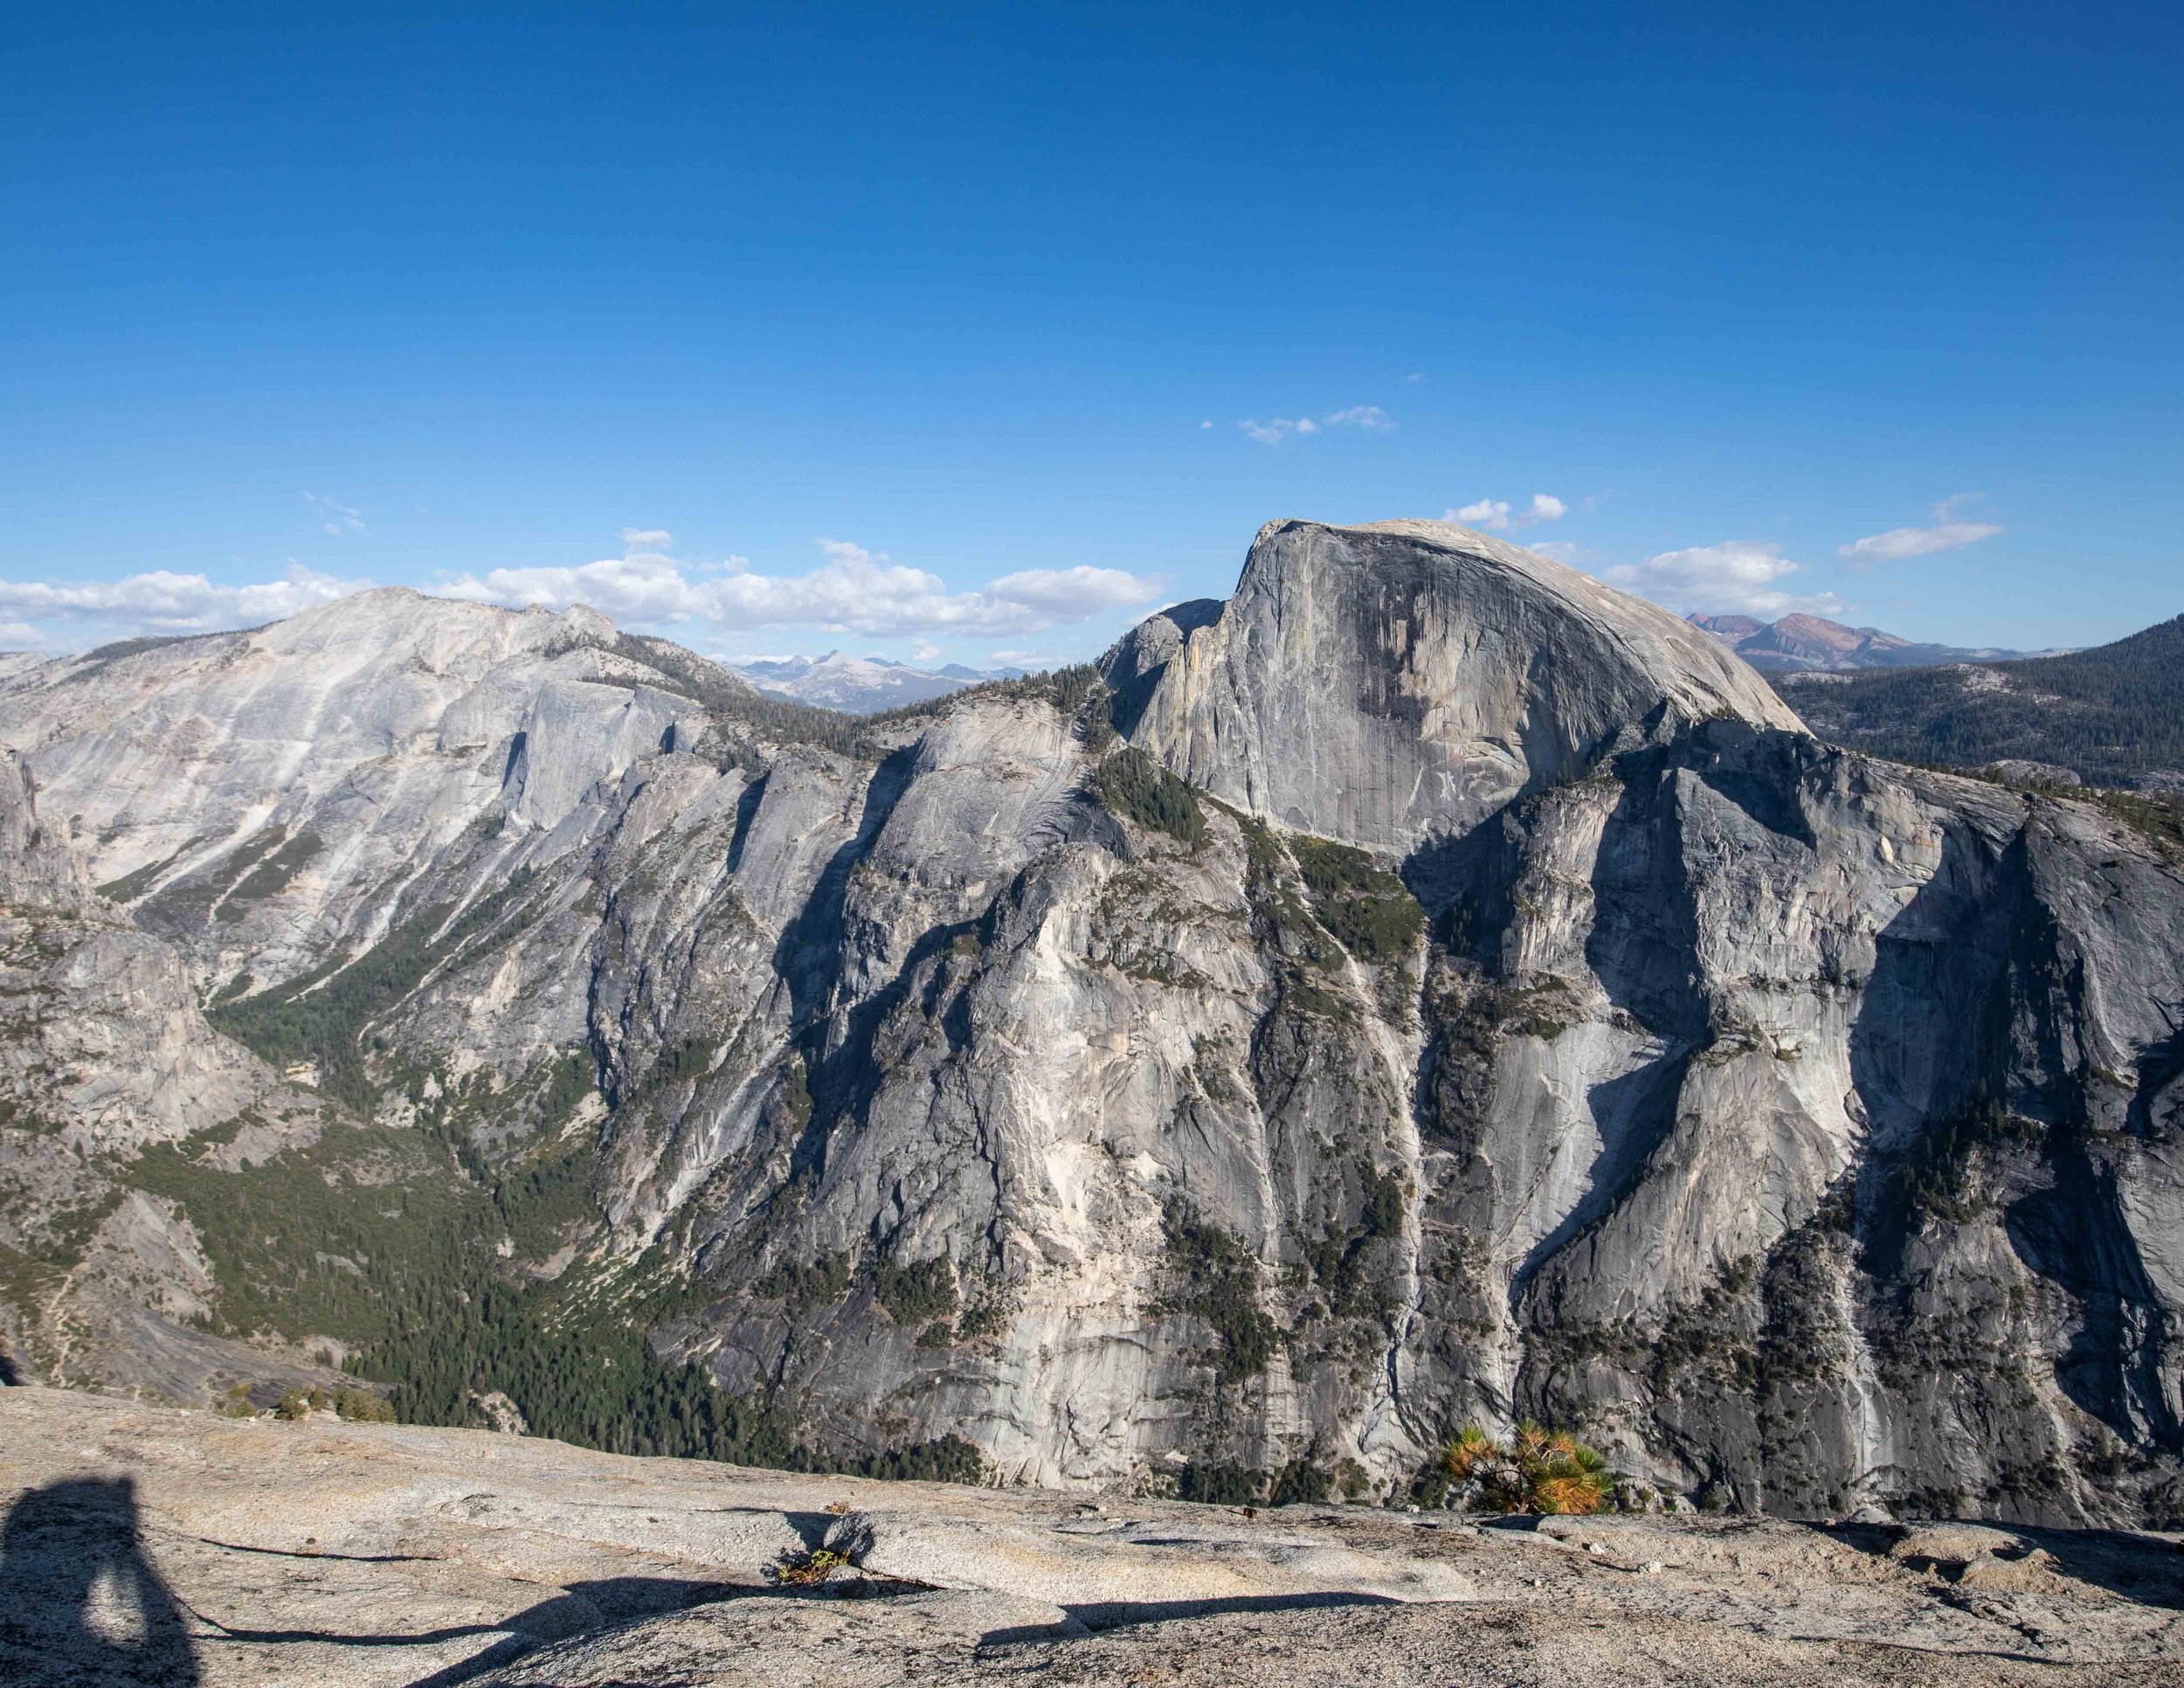
Glacier Point
If you really want to take in the enormity of Half Dome, Glacier Point is the place to go. From here you can see this peak from top to bottom, and marvel at how glaciers carved out this incredible place. The walk to the lookout is less than half a mile return, and flat.
It is one of those unforgettable views, but it can get VERY busy. So that’s why we’ve added in our hidden gem for sunset.

Epic Half Dome views from Glacier Point
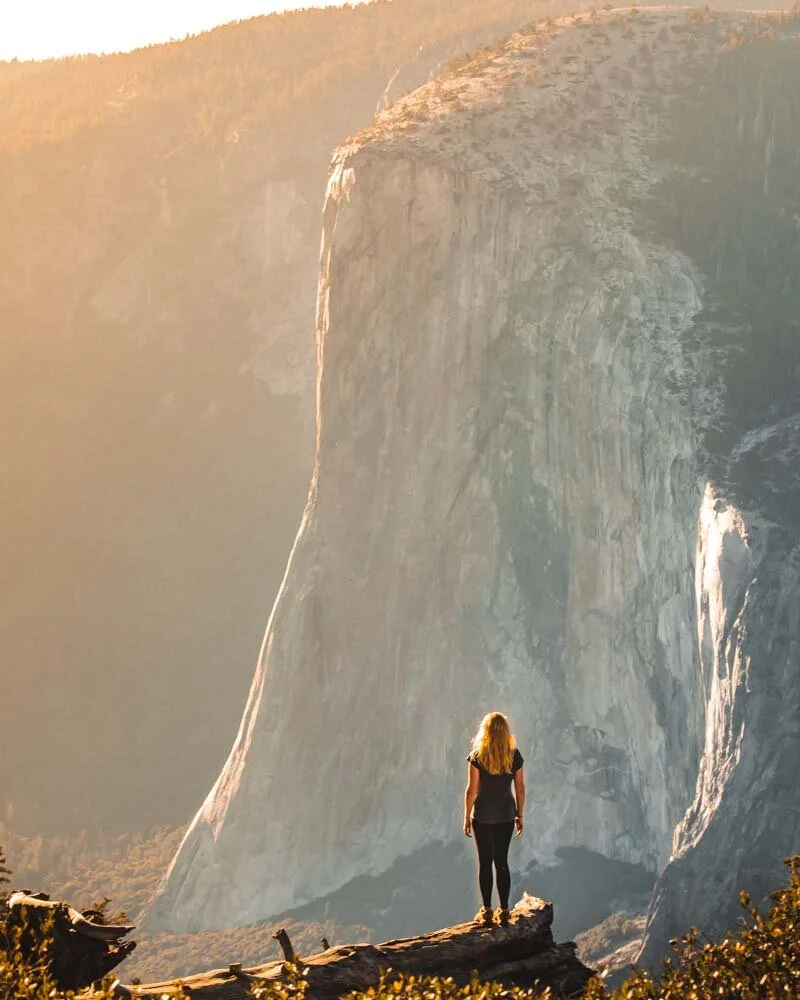
Taft Point & Sentinel Dome
Make sure you arrive at the parking lot at least two hours before sunset and head to Taft Point first. This lookout is a jaw-dropping, death defying ledge that overlooks El Capitan.
It is simply spectacular at the end of the day and is one of the best views in the entire park. It’s a favourite photography spot with Instagrammers.

The iconic ledge at Taft Point
Whilst a lot of people will choose to go here for sunset, our top pick is Sentinel Dome. Hiking from Taft Point. make sure you go via Roosevelt Point, which has another epic view of El Cap, and we’ll be shocked if there’s another person in sight.
We loved it so much we thought about keeping it a secret but then we always promised to share our best tips on this blog so here it is!
Follow the trail up to Sentinel Dome for uninterrupted 360 views of the valley. Yes, this view is a hidden gem and very few people go here. At sunset you can see both El Cap and Half Dome from the same spot, as well as everywhere else for miles in all directions.
Breathtaking and spectacular simply don’t seem to justify how great this place is. The full loop hike is six miles long with 655ft elevation gain, we’ve got a detailed trail guide here.

Half Dome views from Sentinel Dome

El Cap from Sentinel Dome
Day two: take on one of the epic hikes
You can’t leave Yosemite without taking on one of the truly epic hikes. These are the ones which take all day, require an early start and are pretty exhausting, but the rewards are some of the best views in the whole of the USA. That’s no small statement.
If you plan on doing the hike to Half Dome, then you will need a permit well in advance. If you can’t get a permit, fear not - the hike up El Capitan or to the top of Cloud’s Rest are spectacular. We’ll detail them all but we’ve put them in order of preference.
Option one: Half Dome
If you’ve secured your permit this is the one hike you definitely need to do on your trip. Half Dome is one of those bucket list hikes despite being truly terrifying for many people! It’s a long but seriously rewarding day, and allows you to complete three trails in one.
You’ll take the Mist Trail to start with, then up to Half Dome and back to the beginning again via the John Muir Trail. Who doesn’t like a good three for one?
The 18.5 mile hike (with 4500 ft elevation gain) is spectacular, particularly if you are lucky enough to hike it when the waterfalls are pumping. You’ll get fabulous views, some epic waterfalls and of course the death defying final climb up the cables.

Attempting the infamous cables

It really is that steep!
We’re honest in admitting that we couldn’t complete the final section on the cables, we definitely got psyched out by the ranger talk at the checkpoint and also way too many Youtube videos ahead of time - don’t do it! But despite falling short, we don’t regret it, and treasure the memories of this epic hike. Maybe one day we’ll be back with a harness…..
This hike is perfect for thrill-seekers and is one of the most exhilarating in the world (if you’ve hiked Angels Landing we can tell you this is far more intense). Make sure you start early, have ID and your permit, and bring ample water. To help you prepare, here’s what no one tells you about hiking Half Dome.
Option two: El Capitan
Hiking to the top of El Capitan is one of the most incredible trails that barely gets any mention anywhere, it’s not even on the official parks map! Everyone is so fixated on trying to watch the climbers get to the top of El Cap, that they don’t realise you can hike up it yourself.
However, be prepared as this hike is BRUTAL. The relentlessly uphill Upper Yosemite Falls track is just the start of a 19 mile hike (with 5220ft elevation gain) that will take most of the day to complete. It does keep you motivated with amazing views all the way and the satisfaction of making it to the top of El Cap is a buzz that is hard to replicate.

Lunch spot of dreams at Eagle Peak

Standing on the summit of El Cap
Be warned that the view from the summit itself is actually not that great, but the trail as a whole is. The side trail to Eagle Peak has the show stopping view, and that’s included in the trail stats we mention above.
Like Half Dome, start at sunrise and bring ample supplies. You will want a lot of water (or filter as you can drink from the streams), food and energy bars/sweets to help you power through this hike.
Option three: Clouds Rest
This was the hike that was every park rangers favourite. The view from Cloud’s Rest is simply incredible. It’s hard to believe, but this peak is higher than Half Dome and you look down on this Yosemite icon at the end of the trail. The trail is 12.7 miles return with an elevation gain of 4860ft.
Whilst this isn’t as long as some of the other Yosemite hikes - or as steep - it is a hard hike because of the altitude. From the start you’ll notice you are quite high up and the uphill climbs feel that bit more of a slog accordingly.

Exploring the Clouds Rest summit

Looking down at Half Dome from the summit
However, the final ridge and view are well worth the effort. The ridge is unlike any other we saw in Yosemite and the view is truly memorable.
No matter which hike you choose, you’ll have a final day in Yosemite that you will never forget. We’ve got a detailed Clouds Rest trail guide here.
Looking for more California tips?
Well the good news is that we became a bit obsessed with California and wrote a lot of articles on the hikes and epic places to visit in the Golden State. So if you're looking for more tips then check out our guides below:
- Our guide to Yosemite's Lembert Dome
- 16 Big mistakes to avoid in Yosemite
- The best natural hot springs in Mammoth Lakes
- The best hikes in Joshua Tree
- The perfect one day itinerary for Joshua Tree
- The best hikes in Death Valley
- The perfect one day itinerary for Death Valley
- Our favourite hikes in Sequoia and Kings Canyon
- Alabama Hills - California's most instagrammable spot?
Essential Information for a two day visit to Yosemite
You’ll need a car
Whilst Yosemite does run a great shuttle service, you couldn’t get round all of these spots in two days without your own wheels. If you are happy to see less then you can manage most of these spots using the shuttle.
Yosemite National Park entrance fee
You can use the America the Beautiful Annual National Parks Pass to get into Yosemite (US80 per annum). Otherwise it will cost $35 for entry with a car, $30 for a motorbike or $20 per person on foot or bike for 7 days.
As the National Parks Pass is $80 for the year, it is well worth it if you plan on visiting more than three national parks in a year.
Accessing Glacier Point
The full itinerary is based on Glacier Point Road being open, if you’re visiting during the snow season (typically from mid May to mid November but depends on the weather that year) you will have to skip this part of the itinerary. An alternative is to hike up from the valley floor but that’s a half day walk in its own right so you’d have to sacrifice other parts of the itinerary. You also won’t be able to access Taft Point or Sentinel Dome when the road closes.
You could still do the Clouds Rest hike from the valley floor, but it’s longer than from the Tioga Pass Road with more elevation gain. Totally doable but just a bigger effort.
Half Dome cables access
The Half Dome cables are only up for part of the year, usually between the last week of May and the second week of October, but it does depend on the weather that year.
Cell Signal
Cell signal in Yosemite is almost non-existent except by the Visitor Centre. We recommend downloading a map or picking one up from the Visitor Centre to get around and not be reliant on your phone for the day.
Food
Yosemite does have a few places to eat - which are surprisingly affordable - but the wait times can be pretty long. In peak season, it is like Disneyland. The two main spots are Curry Village (which has a buffet, cafe and take away pizza) and Degnan’s near the Visitor Centre.
Where to stay in Yosemite
With just two days you really want to be staying inside the national park if possible. If you’re considering camping, here’s our guide to what no one tells you about camping in Yosemite.
Packing suggestions for Yosemite
Having the right gear can make a huge difference. Here’s what we pack and have relied upon for years:
Sunscreen: A lot of the trails in Yosemite have very little shade and the sun is brutal most of the year! Check for sunscreen on Amazon or REI
Day Pack: Osprey Talon 22 (we’ve owned this for years). Check on Amazon, REI or direct with Osprey
Hiking Boots: Merrell Moab (for men and women). We’ve both used these for over three years and they just keep going. Check them out on REI or Amazon
Trekking poles: We’ve used Black Diamond for years as they are light, solid and durable. Check out REI or Amazon.
Life straw: Something that it useful on the longer hikes as you can fill up and drink from the creeks. You can check them out REI or Amazon.
Reusable water bottle: To avoid single-use plastic. Check then out on REI or Amazon
Icebreaker Base Layer: What we always wear in the winter and makes a huge difference for keeping warm. Check out on REI or Amazon
Looking for more Yosemite inspiration?
Well, luckily we've created tons of articles all about this incredible park. You can head to our California travel guide, or have a look at the posts below:
Hikes
- The 16 best Yosemite hikes
- Sentinel Dome - Yosemite's best kept secret
- What to expect when hiking up the legendary Half Dome trail
- One of Yosemite's quietest trails - North Dome
- One of Yosemite's best - the Clouds Rest Hike
- A hidden gem in Tuolomne - Lembert Dome
Other guides
- A complete guide to Camping in Yosemite
- An epic One Day itinerary for Yosemite
- The best places for Sunset in Yosemite
- Our favourite photography spots in Yosemite
This post may contain affiliate links, meaning at no additional cost to you, that we will earn a small commission if you click through and decide to make a purchase. This helps towards the costs of running our website. :-)
Like it? Pin it!

Follow us on social media
Are you planning a trip to California? Which hikes in Yosemite would make your two day itinerary? Let us know in the comments below!