Once you get to the summit of the Clouds Rest hike, you fully understand the name. You feel like you’re on top of the world with arguably the best view in the whole of Yosemite.
That’s the reason why it’s one of the most popular hikes in the park - the stellar views that make you feel like you’re towering above giants like Half Dome and El Capitan. In fact many rangers rate it as a better walk than the more famous Half Dome hike.
However, it’s definitely no walk in the park, you have to work for those views but it is definitely worth it and a must for your Yosemite itinerary. Here’s everything you need to know about the Clouds Rest hike before you go.
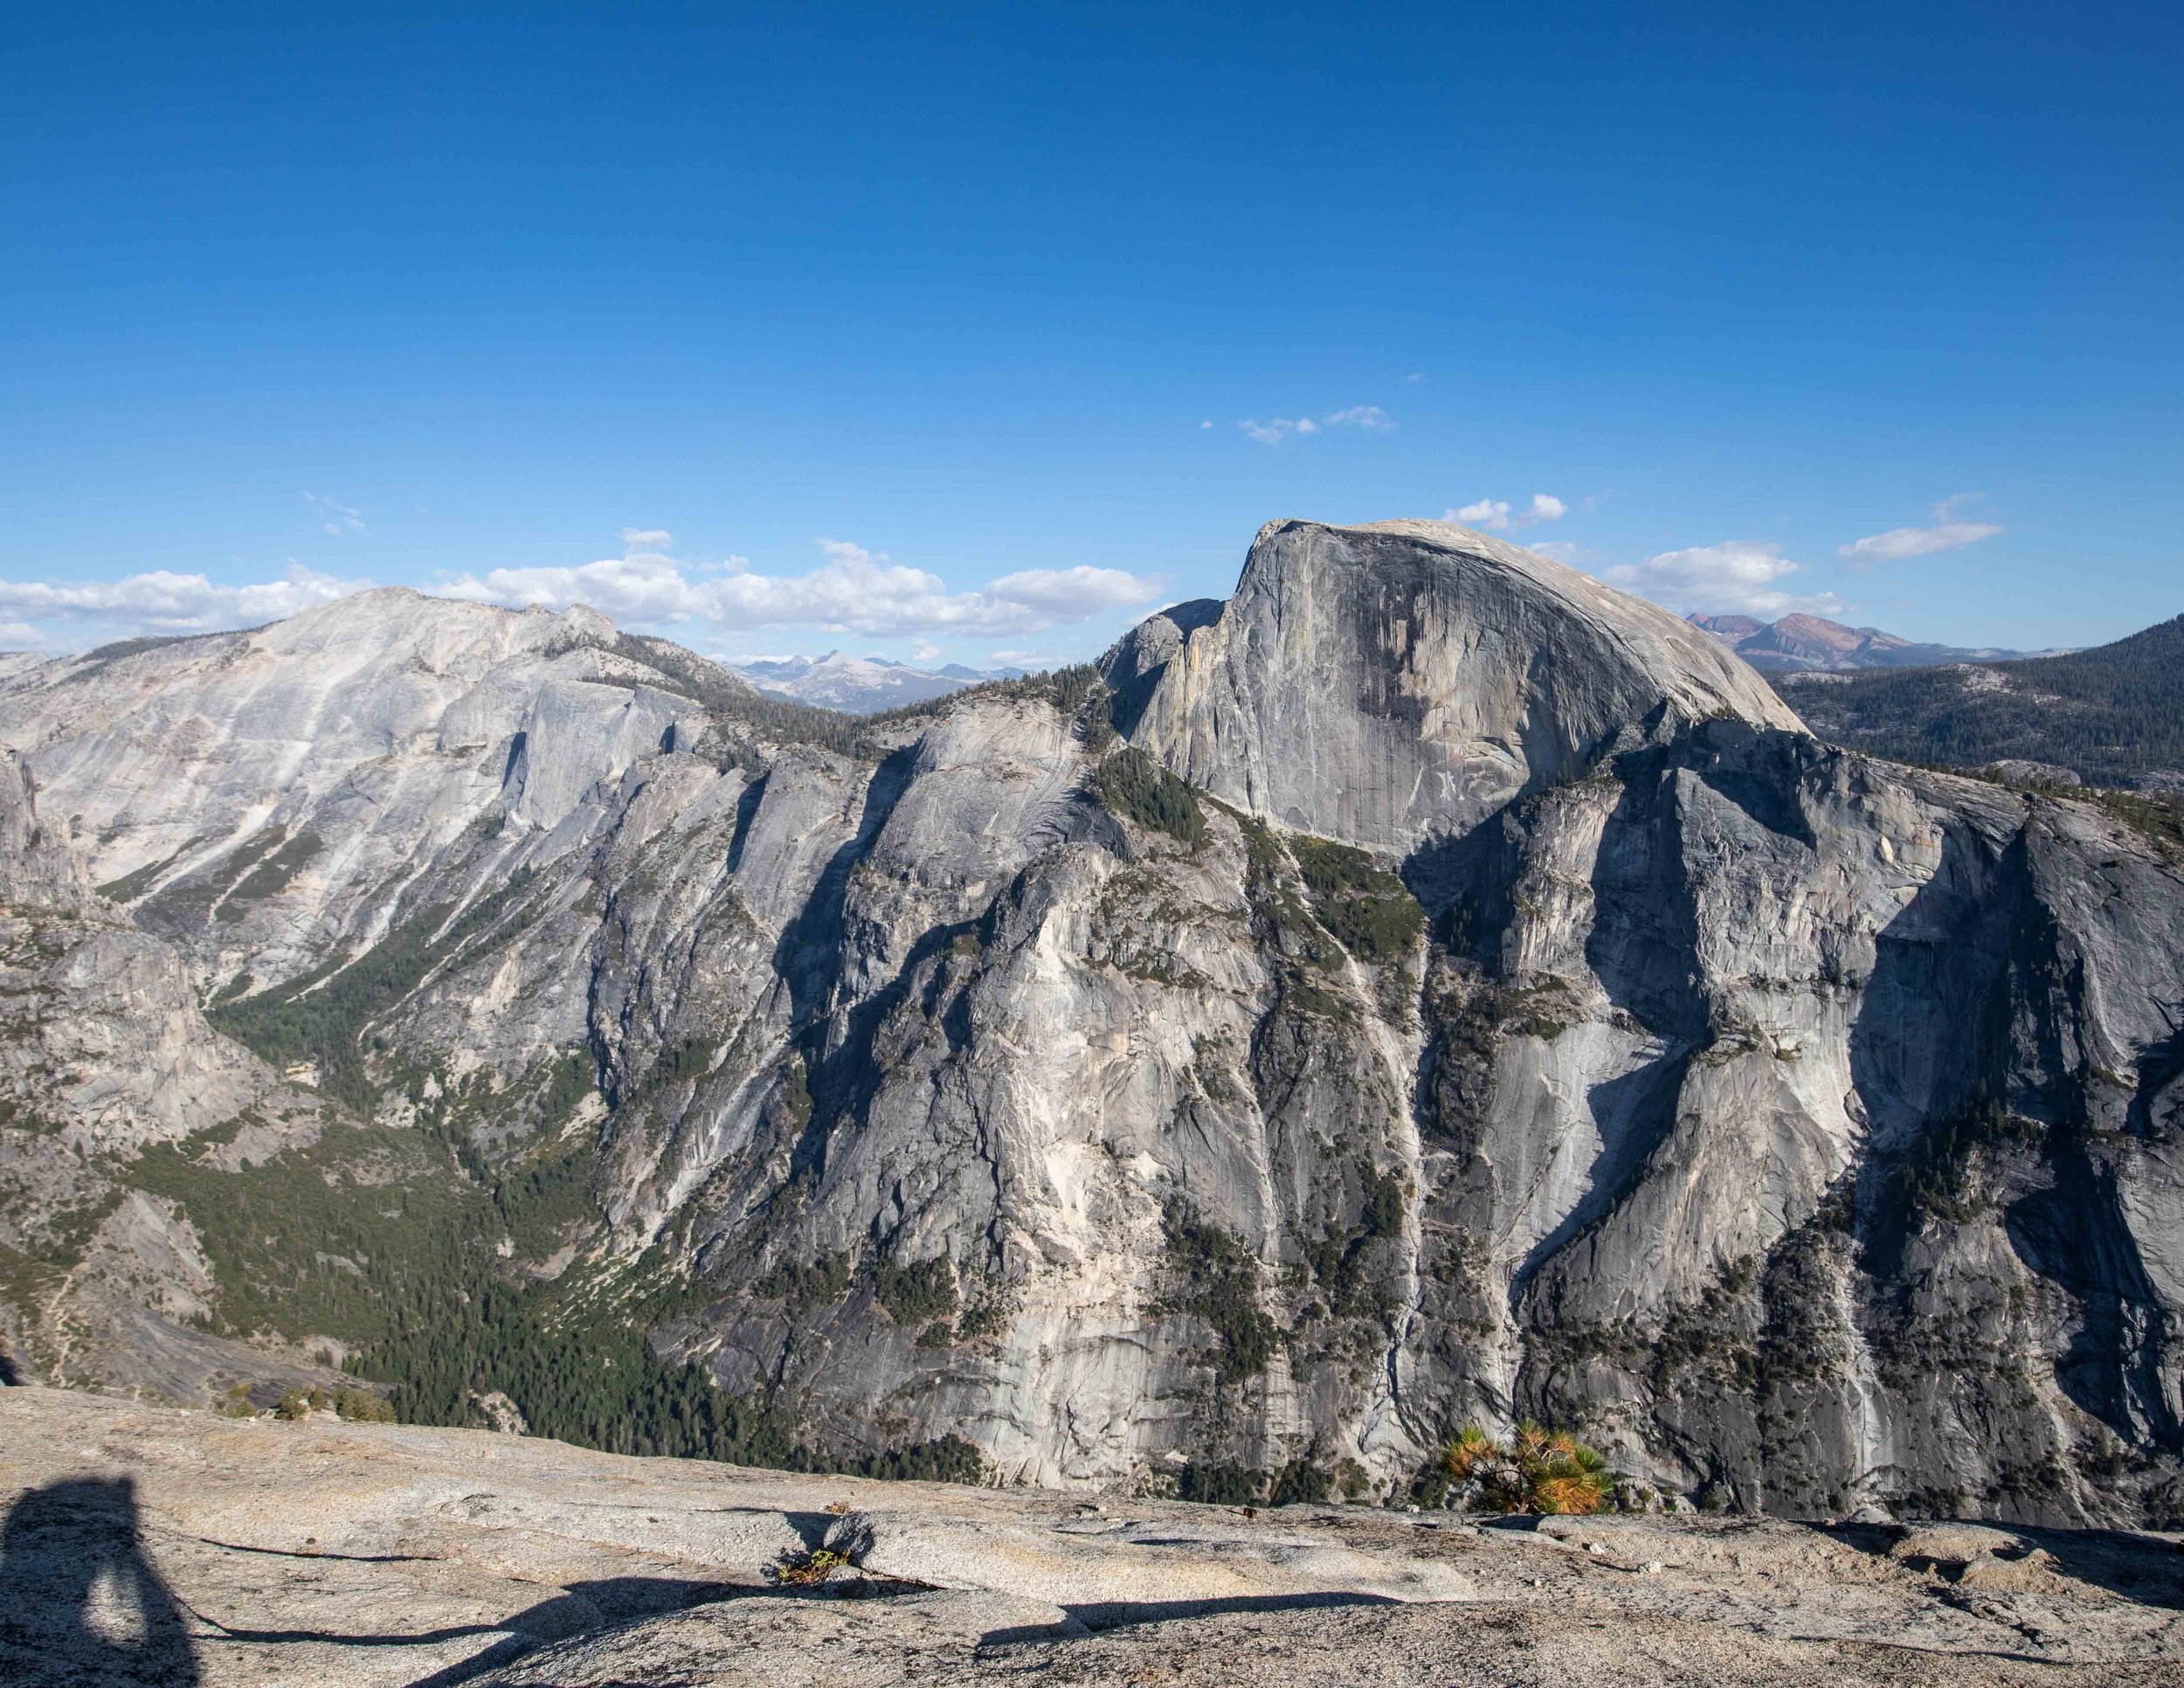
Clouds Rest hike - the view from the summit
Clouds Rest hike
Clouds Rest hike stats
Distance: 12.7 miles (20.5km)
Elevation: 4860ft (920m)
Time taken: 5 hours 45
Type of trail: out and back
The Clouds Rest hike is one of the hardest in Yosemite for a few reasons. Firstly the trail is one of the highest in Yosemite, making those uphill climbs even harder! Second it’s very long and thirdly it’s very steep - especially at the start of the trail.
However, the hard work is worth it. The ridge is unlike anywhere in the park and the views from Clouds Rest are one of the best in Yosemite. You will feel the strain on the trail is rewarded at the end.
We took just under 6 hours to both the walk to the lookout and back, but you may want to add in more time. We recommend starting early so you’re not in a rush.
Starting the trail
The hardest thing to contend with on the Clouds Rest hike is the altitude (yep you read that correctly!). The trail starts at 8,150ft, which may not seem so high at first, but it really kicks in when you start climbing. The air is thinner here than the valley floor, so you feel breathless a lot more.
Starting at Sunrise car park by Tenaya Lake, the trail heads straight into the forest before coming to a riverbed. We hiked in fall and didn’t have to cross the river (which had obviously dried up but I’d read sometimes the water can be calf height).

The start of the Clouds Rest hike
You’ll have a slight downhill and then just over a mile of flat walking before the steep ascent begins. This will be your first dose of the thin air and we really struggled! The first mile is the toughest but you can take your time with plenty of rocks to sit on for a break.
Luckily this is the hardest section of the whole trail so you know when’ve you’ve got up this bit you can make it the whole way. The trail is in the forest but it’s not dense so you get some views as you follow several switchbacks across very rocky terrain.


After a stiff climb you’ll reach the top of the hump and start descending. This may feel like a welcome break, but it’s a debt you’ll have to pay on the way back! The path will keep going downhill and then undulate (much more gently than the first climb) before you reach a lake.
Read next: The North Dome hike - a quiet gem in Yosemite
The lake
We got less breathless from this point on which was a welcome relief! The lake is about the midway point of the hike, and offers a little more flat ground before it is uphill all the way to the top!
After the lake, you head back into the forest and uphill again. It isn’t as relentlessly steep as the start and feels a lot easier for the next mile. After that it steepens again - but never close to the first climb - and you’ll see the trees begin to thin out and realise that you’re not so far away from the top now!

The lake which marks roughly half way on the Clouds Rest hike
Eventually you leave most of the tress behind and hit the granite. This is the first really great view from the trail and a good place to stop for a break if you need to.
It get’s a little steeper and rockier but it’s not a slippery path and by now you know you’re moments away from the much anticipated ridge.
Read next: Sentinel Dome - Yosemite’s hidden gem

The view before you get to the ridge near the summit of Clouds Rest
Read next: 16 mistakes you will want to avoid in Yosemite
Clouds Rest ridge
The ridge at Clouds Rest was all that people were talking about on the trail! On the way up, we met a couple who were eager to share their tips on how to tackle it.
We were preparing for a scramble and a death defying traverse! They said to take our time, think it through and take the path to the left.
Others asked if we thought we were going to make it! It was beginning to sound like the Half Dome Cables and more than a little intimidating.

The ridge on the Cloud Rest Hike
However, thankfully it was nothing like that! The ridge is wide, has a lot of grip and is actually the kind of section of trail we love! We can understand why those with serious vertigo would want to avoid it (the drops are HUGE), but the majority will find it a section to be careful on, but not fear.
We didn’t see a single person who wasn’t able to finish it, so don’t be deterred! We did choose the path to the left on the way there as that was what we were advised but on the way back we went straight down the middle and it wasn’t difficult at all.
A word of caution on the path to the left, initially we thought they meant the actual trail to the left by the start of the rocky ridge but this takes you back down to Yosemite Valley!
Luckily we realised our mistake quickly, when people are talking about the easier route on the left they just mean to the left side of the ridge, not left at the start of the ridge.
Read next: The top Yosemite Sunset Spots


The truth is that the ridge here is breathtaking. You walk so high and have 360 views of one of the most beautiful parts of the United States. In all directions we were in awe, and never felt any fear. The one thing that was slightly tricky was the snow and ice in patches but these were fairly easily avoided.
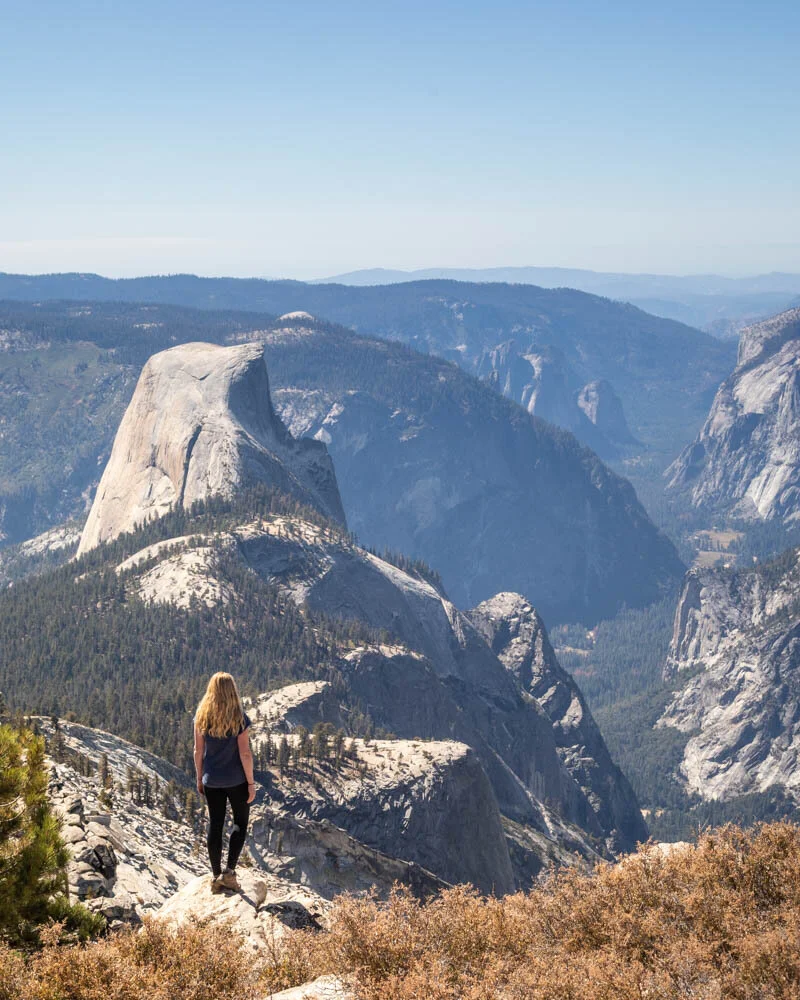
The Clouds Rest summit offers outstanding views, looking down on Half Dome - a place which is over 8839ft tall, Clouds Rest is over 1000ft taller It’s the perfect place to have lunch and explore. It’s actually a sprawling area so you could spend quite a while up there.
It is truly one of the best views in the whole of Yosemite (which is a competitive field!).
The hardest part at the summit is making the effort and deciding it’s probably time to make the long hike back!

Admiring Half Dome from the Clouds Rest summit
The return
After the adventures of the ascent, the return is a relatively mundane affair, but pretty lengthy at over six miles!

Exploring the Clouds Rest summit
It starts by going downhill towards the lake which is pretty straightforward. Then the soul destroying climb begins. It’s not awful but it is tiring after all you’ve already done! Once you reach the saddle it’s steeply downhill across a rocky path which can be a little slippery on the way down and fairly tough on the knees.
Once the rocky descent is done the last mile or so is flat and easy to the car park at Tenaya Lake.
We loved this hike and the chance to explore a completely different part of Yosemite away from the valley floor.
Clouds Rest vs Half Dome
If you plan to take on one of Yosemite’s big hikes, chances are you have Half Dome or Clouds Rest on your list. Interestingly, we met very few that wanted to hike El Capitan, which is pretty surprising given how iconic it is. But anyway I digress.
Having hiked both Clouds Rest and Half Dome (although we couldn’t get all the way up the cables after finding it too scary!), we can tell you that - contrary to what most people say - we think the Half Dome hike is actually more impressive.
It is more varied, with more to see for most of the hike. However, from everyone we’ve spoken to, and pictures we’ve seen, the Clouds Rest hike has a much better view from the summit. After all, everyone wants to look at Half Dome, which you clearly can’t do when you’re standing on it.
Difficulty
In terms of difficulty, Half Dome is much harder and chances are if you start the Clouds Rest hike you will finish it. There’s nothing technical or scary about Clouds Rest, so you will definitely have the gratification of making it to the summit.
With Half Dome you may or you may not get to the summit, as around 30% of people hiking on our day didn’t get up the cables due to fear of slipping on the smooth granite (and the fact a woman had tragically fallen to her death two weeks before which had everyone rattled).
Clouds Rest is at a higher elevation, so we felt more breathless at first, but otherwise it is significantly shorter and easier than Half Dome.
Excitement
For the excitement factor, Half Dome wins in the sense that it has the cables and - love them or hate them - they certainly get everyone’s heartbeat going. Despite not making it to the very top we were still pretty happy to have had the opportunity to get even part way up.
If you make it the whole way the satisfaction will be on another level.
Crowds
When it comes to the crowds, Clouds Rest - whilst still popular - is much quieter than Half Dome. For the most part we were hiking on our own. On Half Dome you only need to look at our pictures to see the crowds that flock to this iconic track.
Overall
So overall, we’d say if you’re looking for adventure and a scenic track, and don’t mind the less beautiful summit, go for Half Dome. If you prefer a quieter hike with a truly spectacular summit - or don’t want to take on the somewhat dangerous cables - then go for Clouds Rest.
Of course we’d always say do both if you can : )
Have you done both and have an opinion on which is better? We’d love to hear it!
Read next: The Lembert Dome hike - for the best views of the Tuolomne Meadows
Essential info about the Clouds Rest hike
The trailhead
The trailhead for Clouds Rest is at Sunshine at Tenaya Lake. The car park here is pretty small and you will inevitably have to park on the road unless you arrive early. Be very careful where you choose as people drive incredibly fast round the corner here, so try to pick somewhere along the straighter part of the road!
The trailhead is just under 50 miles from Yosemite Valley, along the Tioga Pass Road. It’s a windy road though so it will probably take at least 1 hour 15 to get to. To be closer you could camp at Tuolomne Meadows, here’s our guide to camping in Yosemite to help you with booking.
The road is closed due to snow for part of the year making hiking from Tenaya Lake impossible, we have more details in this post on visiting Yosemite in fall.
Altitude
This was one of the few hikes in Yosemite where we really felt the altitude. It made us out of breath and pretty lethargic.
It isn’t Everest and you can overcome this once you get used to it, but it is probably the main reason why most people believe this is a really hard hike (if it wasn’t for the altitude it would probably be on the moderate side). Give yourself time and have plenty of breaks to catch your breath.
Yosemite National Park entrance fee
You can use the America the Beautiful Annual National Parks Pass to get into Yosemite (US80 per annum). Otherwise it will cost $35 for entry with a car, $30 for a motorbike or $20 per person on foot or bike for 7 days.
As the National Parks Pass is $80 for the year, it is well worth it if you plan on visiting more than three national parks in a year.
Packing suggestions for Clouds Rest
Having the right gear can make a huge difference, especially when hiking to Clouds Rest. We did this in September and snow had began to settle already, so having gear for cold conditions is highly recommended. Here’s what we pack and have relied upon for years:
Sunscreen: A lot of the trails in Yosemite have very little shade and the sun is brutal most of the year! Check for sunscreen on Amazon or REI
Day Pack: Osprey Talon 22 (we’ve owned this for years). Check on Amazon, REI or direct with Osprey
Hiking Boots: Merrell Moab (for men and women). We’ve both used these for over three years and they just keep going. Check them out on REI or Amazon
Trekking poles: We’ve used Black Diamond for years as they are light, solid and durable. Check out REI or Amazon.
Life straw: Something that it useful on the longer hikes as you can fill up and drink from the creeks. You can check them out REI or Amazon.
Reusable water bottle: To avoid single-use plastic. Check then out on REI or Amazon
Just in case:
This post may contain affiliate links, meaning at no additional cost to you, that we will earn a small commission if you click through and decide to make a purchase. This helps towards the costs of running our website. :-)
Like it? Pin it!

Follow us on Social Media
Are you planning a trip to Yosemite? Would you take on the altitude on the Cloud Rest hike? Let us know in the comments below!