In decades of hiking, no trail has elicited emotions in us like the Half Dome hike did. This stunning trail takes you past some of Yosemite greatest highlights, leaving you in awe of this beautiful valley and then - after 10 miles of uphill hiking - presents you with a challenge that will likely scare the life out of you.
We’ll be honest upfront: we didn’t make it all the way to the summit. The Half Dome cables were too much for us and we had to turn back with just 200 feet to go, knowing that the mountain had defeated us. It had taken us less than four hours to get there - a decent time for Half Dome - but the slippery granite rock on the near vertical climb was one step too far! This was a hard choice, but we didn’t feel the cables were safe enough for us.
So having done the majority of the trail, we thought we’d put together a list of the things no one tells you about the Half Dome hike. We hope this will help you decide whether you want to take this on this epic challenge.
The Half Dome Hike: 14 things no one tells you
The Half Dome Hike: 14 things no one tells you
Here’s the 14 things no one tells you about hiking up Half Dome
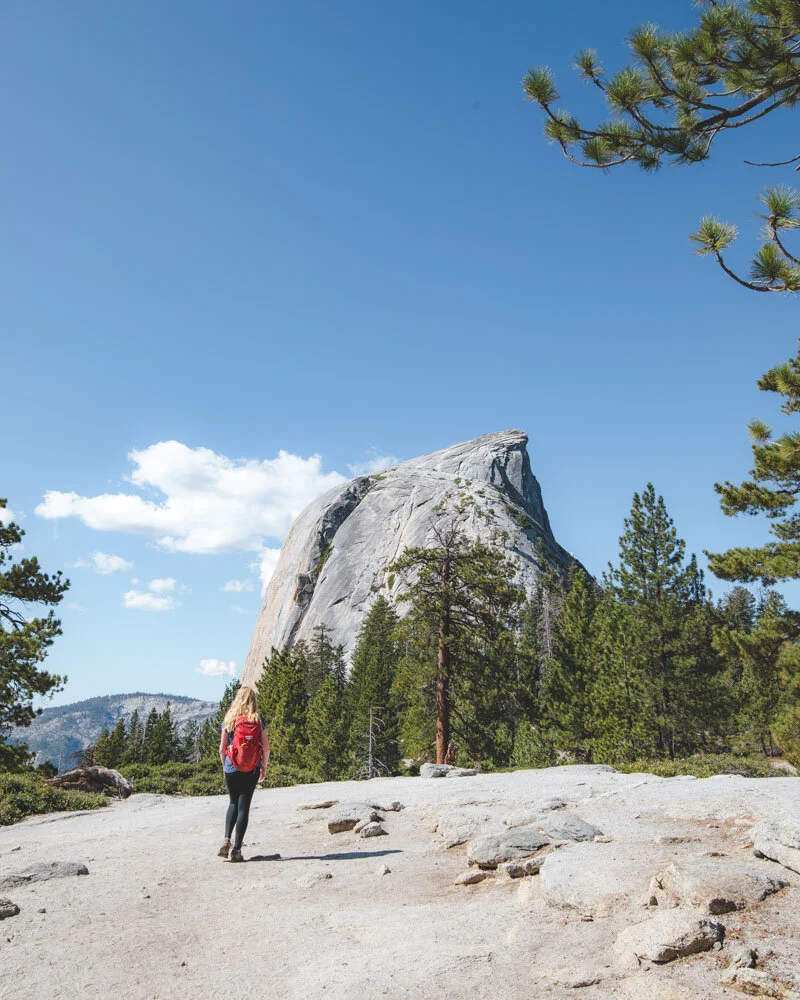
1 - It’s a long steep hike to get to the cables, but it isn’t as bad as you think
At nearly 10 miles and over 5000ft elevation gain the walk to get to the cables is not easy, but it isn’t as hard as we’ve seen it described many times.
There is actually a fair amount of flat trail which allows you to get your breath back between the steep climbs.
Having read about what a beast it was we were surprised and delighted to find some flat sections, particularly the one mile stretch through Little Yosemite Valley.
We’ve also heard the Sub Dome described as frightening, and I was nervous to take it on, but in truth it is mostly stairs which - though exposed - are not difficult or narrow (although use caution when descending). The stairs are really steep, but have been cut into the rock which means you have stable footing. It’s tiring, but not frightening.
The final granite scramble to the top of the Sub Dome is not really exposed and is nice and grippy (in good weather). Don’t let it psyche you out when you see it, it really isn’t that bad.
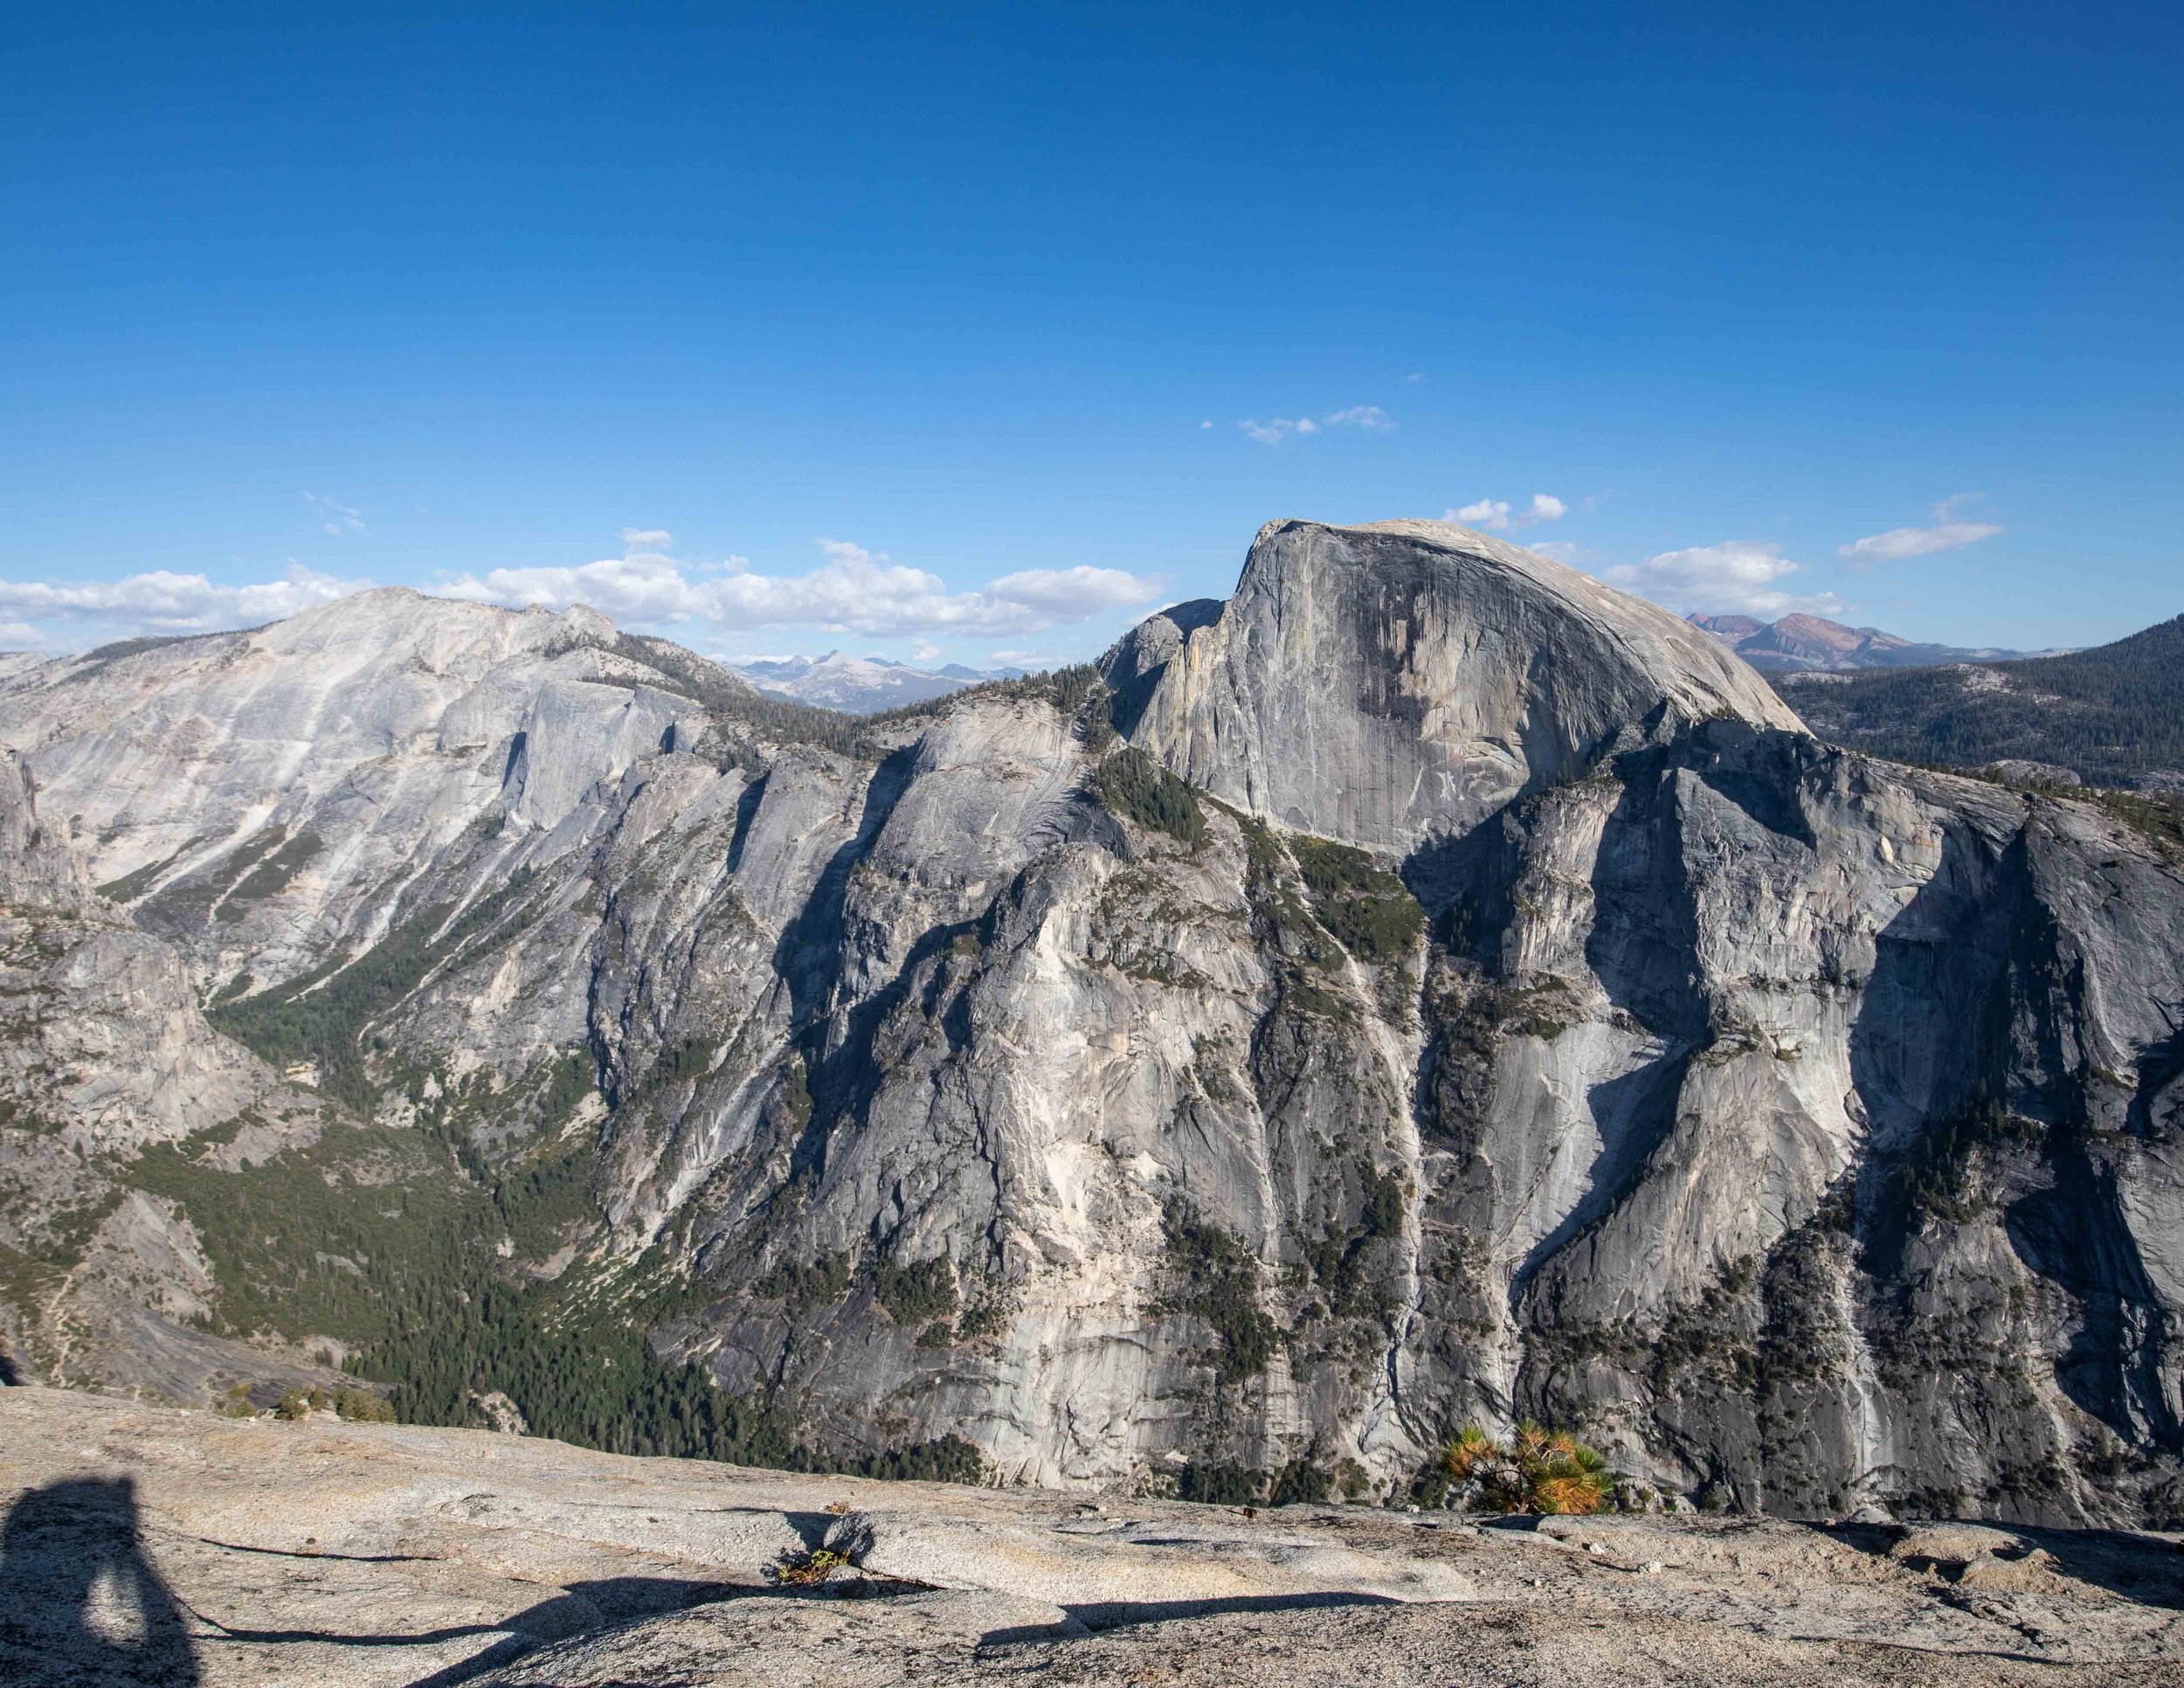
The trail is also visually stunning and up there with the best day hikes we’ve ever done. The only part which will concern the majority of people is the cables.
Half Dome hike: the views of Sub Dome and Half Dome on the trail
Read next: 16 Big mistakes to avoid in Yosemite
2 - The majority of people get to the summit safely
So whilst we didn’t complete the hike, the truth is that the majority of people who get to the cables make it to the top. Whilst people have died on the cables (about one every few years), this is put into context when you realise 300 permits are issued per day in cables season (which is several months long).
We won’t say the cables are safe (and in fact the ranger that checks your permit on the Sub Dome will tell you that they are categorically not safe), but most people get to the top and many of them are casual hikers. We saw people in tennis shoes and even sandals climb up the cables!
If you are determined, have a good head for heights, some really good upper body strength and patience, you will be able to complete the cables section of the hike.
However....

The Half Dome Hike: The Cables
3 - 20-30% of people turn back
A lot more people don’t hike up the cables than you would think! When we were watching the cables, we noticed that 2-3 in every 10 people went up a little and came back down. Some took one look and immediately offered their gloves to anyone who had forgotten a pair!
It is completely fine to turn back as this is a genuinely scary section of hiking. It is far worse than anything we’ve ever seen in a decade of hiking around the world (Angels Landing has nothing on Half Dome). So if you’re not sure, just go and see it for yourself! You can go up the first few rungs, see how you feel and assess. After all, everyone’s definition of scary is different and it’s really hard to know what you’re in for until you see it with your own eyes.
The hike to the cables alone is well worth it, even if you don’t make it to the very end.
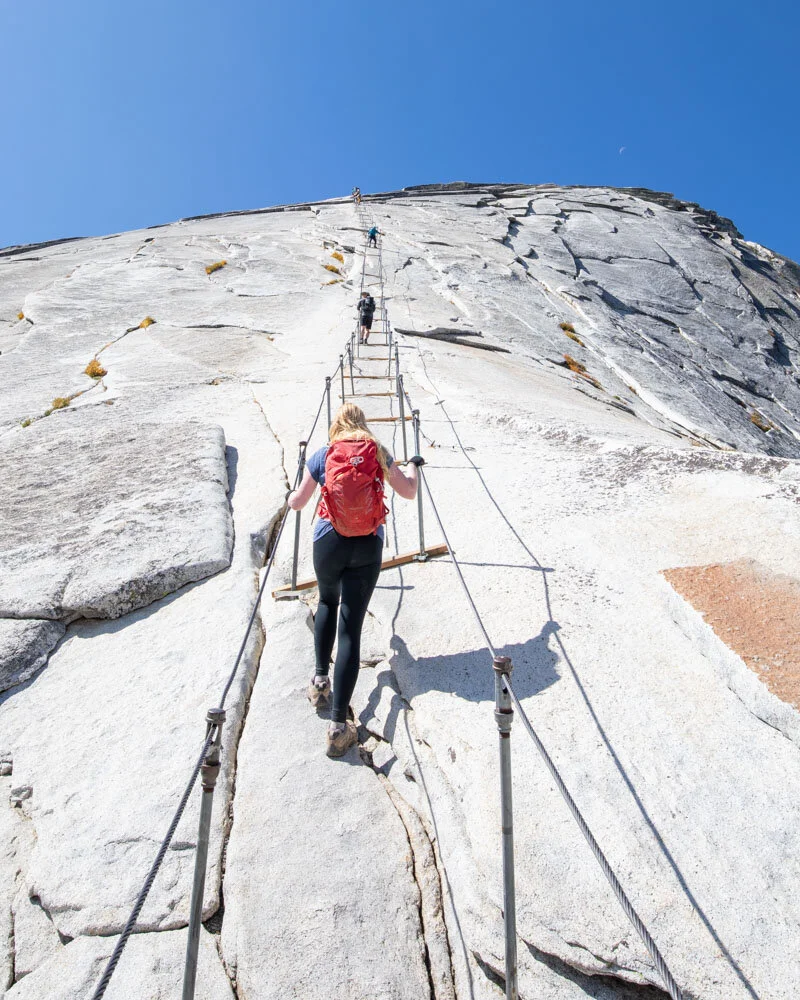
Half Dome Hike: Trying to climb the cables
4 - It can get very busy up there
You remember that photo of the queues at the summit of Everest (you can click here to see it if you don’t remember)? Well getting to the summit of Half Dome can be quite like that!
The cables can get very congested as the majority of people start their hike at sunrise and arrive at 10-11am. By this time progress on the cables is very slow as everyone goes up and down the same way. There are bottlenecks caused by sections where you have to climb up or down overhangs which slow people down, causing queues to back up.
This means that if you turn up when it’s busy, you’ll spend some time waiting on the side of the cliff, standing on the wooden planks whilst people move along.
We also saw lots of people dropping things which was genuinely quite scary to see as water bottles dropping from a great height could knock you out. Secure all your stuff in a zipped bag before ascending!
For us the crowds were another factor that put us off, most people are very considerate but there is always one or two who push and shove their way past you for going too slow.
The Half Dome hike: The queues on the cables
5 - If you want to beat the queues on the cables, start at 3am!
Yes, you read that correctly. The only way to guarantee you beat the queues on the cables is if you get there around sunrise. Allowing 4-5 hours for hiking the trail, this can mean a 3am start! The queues on the cables start really early and by 10am it is rush hour up there.
6 - Even those who completed it, said they’d never do it again!
Making it to the top of the Half Dome hike is an incredible achievement. You’ve walked over 10 miles in the blazing heat and hauled yourself up an incredibly steep and slick wall to the top. Anyone who makes it to the top has really been put to the test in terms of day hiking.
But the majority of people saw the cables section as something so terrifying that they would never do it again! It really is a once in a lifetime hike.
There will obviously be exceptions, but we spent over two hours sitting at the cables debating whether to make a second attempt and we spoke to loads of people coming down and the consensus was definitely that once was enough!
7 - The poles that hold up the cables can actually come out
Yep that’s right. The poles are not bolted into the ground (hence the cables are only up for part of the year) so one good tug (and we saw it happen) and the poles come right out of the hole. Not something that makes you feel good halfway up a precarious climb.
Go easy on the chains and poles but don’t panic if you accidentally pull one out, just slot it back in again.
Also those wooden planks are on uneven ground, meaning that they can wobble!
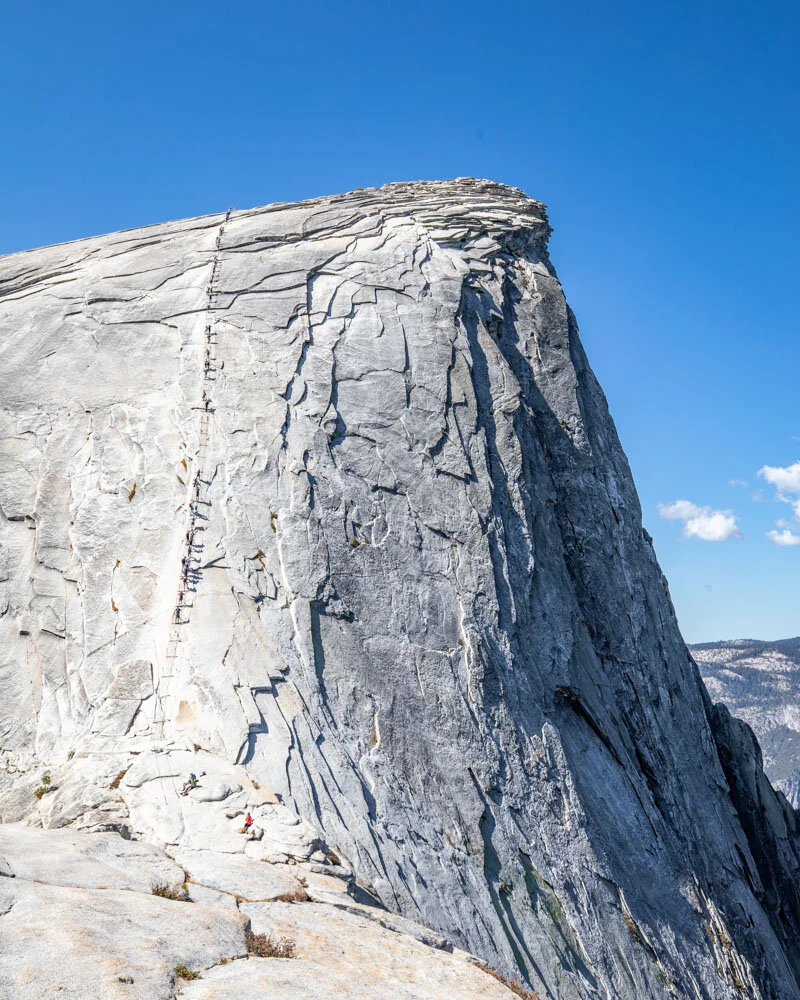
Half Dome Hike: The cables from the sub dome
Read next: How to hike up to the top of El Capitan
8 - We recommend training for the Half Dome hike
We recommend doing some hiking and some weights before taking on Half Dome as it will make your experience a lot better. This is a tiring hike at 20 miles in total and 4500ft in elevation.
We stayed in the campsite that was close to the trailhead (Lower Pines) and in total we did over 46,000 steps that day! It was a full day of hiking, leaving at sunrise and returning at sunset!
If you can, do some hikes which are long and steep so that you don’t find yourself struggling on this beautiful trail. You will need some upper body strength on the higher section of the cables as the rock becomes so slippery that if your feet go, you must rely on your arms!
Again most people could make it, but feeling confident in your upper body strength will help.

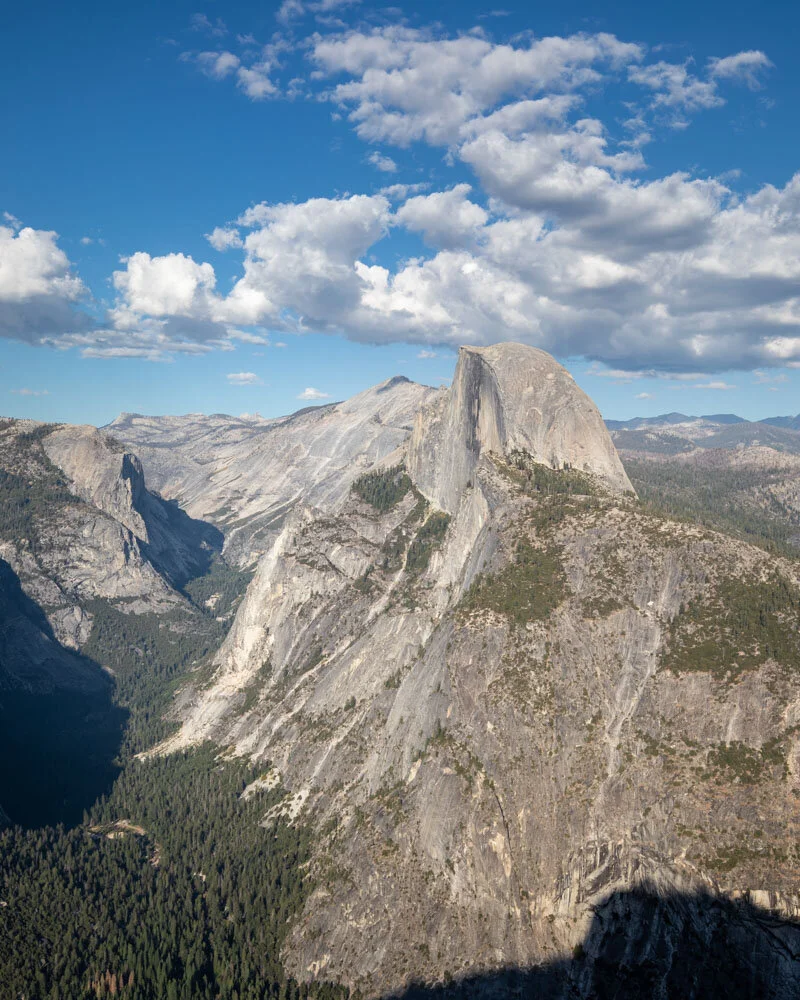
Half Dome hike: the views from the Sub Dome
9 - A harness will help, but won’t guarantee your safety or that you’ll make it
There’s a lot of debate about harnesses on the Half Dome hike and it is really down to you as to whether you would feel better with one of not. Some people think it slows everyone down, and you can feel pressure from the queues forming behind you. Others think that the security of having it made all the difference to their hike.
A harness could make you feel more secure, but just be aware that the cables were never designed as a Via Ferrata - the poles can come out the ground as they were designed as a handrail cable to haul yourself up on. It will probably help, but it doesn’t have the security of a Via Ferrata.
If you intend on using a harness, make sure you have two clips with one always clipped onto the cable. Make sure you know how to use it as someone very sadly died recently on the cables at Half Dome, despite having a harness.
Be aware that a harness is also a safety back up and won’t help you climb this steep section. You need strength in your arms and legs to get to the top.
We noticed on the day we hiked (two weeks after the terrible incident of a woman falling to her death), over half the people hiking had a harness and they all said they would never attempt it without one.
From all our research it seems that in the past most people didn’t use harnesses and they were even frowned upon but the recent death had clearly had a big impact.
Read more: The Lembert Dome hike - the best trail in the Tuolomne Meadows
10 - The slick rock means you need seriously good upper body strength
In the end, what defeated us was the slippery rock. After nearly 100 years of people hiking up the cables, the rock on Half Dome has been worn so smooth that it has become slick.
Ordinarily granite is good for climbing, and we’ve done many hikes where it feels incredibly grippy and safe, but none have had the incredible foot fall of the Half Dome hike.
When you add in a 45 degree gradient you get a very slippery trail. This means you have to rely on your arms (specifically your forearms) to take your entire body weight up and down on certain sections, as your feet can’t offer much.
We openly admit that our upper body strength isn’t good, so couldn’t get beyond the first half of the cables in what we considered to be the least risky section. Assess the cables before you commit to going up, as there are stories of people having panic attacks half way up.

Half Dome at sunset
11 - You need a permit AND a photo ID
Yep, even in the wilderness the bureaucracy can be the thing that stops you from reaching the top! Simply having your permit isn’t enough, the ranger will ask for a photo ID of the person the booking is under, so make sure you bring it with you! You should be ok with a photo of your passport or driving license (which is what we took as we accidentally left our passports behind!).
We saw some people who had a booking, but were turned away as they didn’t have an ID. Pretty soul destroying as you aren’t checked until the Sub Dome (about 0.5 miles away from the summit)!
This also goes for trying to get to the cables if the person who booked the permit isn’t there. We saw a group who tried to go without the lead person (who supposedly needed emergency root canal surgery - ouch!), but were turned away. Such a shame for the whole group. It’s easier to get a permit in fall than summer, we’ve got more details in this post.
12 - However, if you don’t have a permit, you may be able to tag onto someone else’s group
If you didn’t get a permit, you may still have a chance. We were told by the ranger that if someone with a permit had a spare spot in their group (ie they booked for a group of two but the other had to pull out) then anyone else could take that spot, providing the lead person was there. Permits can’t be transferred, but you can join the group so long as it doesn’t go beyond their allocation.
It requires luck (and someone being happy for you to tag along) but you may be able to get onto the cables if you weren’t successful in getting your own permit.
Read next: The best view of Half Dome - The Clouds Rest hike
13 - The descent on the John Muir Trail is actually seriously slippery
Everything you read will tell you to descend on the John Muir Trail as - though it is 1.5 miles longer than the Mist Trail - it is a shallower gradient. That part is true, but absolutely no one mentions that the John Muir Trail has a fine layer of sand over much of it making it super slippery. One woman who also hiked down from Half Dome with us declared it ‘prime skull cracking territory’. We were glad to have poles on this section.
In most seasons it will still be a better descent than the Mist Trail which would be slippery from water but in fall when there was no mist on the Mist Trail we wished we’d gone that way!

Half Dome Hike: one of the nicer parts of the John Muir Trail!
14 - No matter what, just go for it. It is a beautiful hike.
As we said earlier, the Half Dome hike is a beautiful trail and one of our favourite Yosemite walks. Just keep an open mind.
If you can make it, then there’s no doubt it will be one of the most satisfying hikes you’ll ever do. However, even if you turn back, just appreciate being one of the few that get to see Half Dome in this way. Even if you do suffer from summit fever 😂
We’ve already talked about one day returning with a harness and after a few good weights session to try our luck again!
Packing suggestions for Half Dome
Having the right gear can make a huge difference when hiking Half Dome. Here’s what we pack and have relied upon for years:
Sunscreen: The hike up Half Dome has very little shade and the sun is brutal most of the year! Check for sunscreen on Amazon or REI
Gloves for the cables: This is a must if you want to go to the very top. Having good gloves with grip can be a gamechanger. Check on REI or Amazon
Day Pack: Osprey Talon 22 (we’ve owned this for years). Check on Amazon, REI or direct with Osprey
Hiking Boots: Merrell Moab (for men and women). We’ve both used these for over three years and they just keep going. Check them out on REI or Amazon
Trekking poles: We’ve used Black Diamond for years as they are light, solid and durable. Check out REI or Amazon.
Life straw: Something that is useful as you can fill up and drink from the creeks. You can check them out REI or Amazon.
Reusable water bottle: To avoid single-use plastic. Check then out on REI or Amazon
Icebreaker Base Layer: What we always wear in the winter and makes a huge difference for keeping warm. Check out on REI or Amazon
This post may contain affiliate links, meaning at no additional cost to you, that we will earn a small commission if you click through and decide to make a purchase. This helps towards the costs of running our website. :-)
Like it? Pin it!


Follow us on social media
Are you planning a trip to Yosemite? Would you take on the Half Dome hike? Let us know in the comments below!