As soon as I heard the words “Via Ferrata Banff” it sent a shiver down my spine. I loved the idea of trying out something new - a bridge between hiking and rock climbing - but I was also pretty terrified too.
If you’ve been following this blog for a while you might often see me standing near a cliff edge or hiking on a narrow path, but more often than not these are clever camera angles or very stable spots where I feel very secure.
The reality is I am often quite jelly legged when it comes to exposure. But in the spirit of you only live once, and Banff is the perfect place to try something a little out your comfort zone I decided to give it a go.
Here’s what it’s like to take on the Banff Via Ferrata if you are a little afraid of heights (and also if you’re not, Joe isn’t so I’ll describe it from both perspectives).
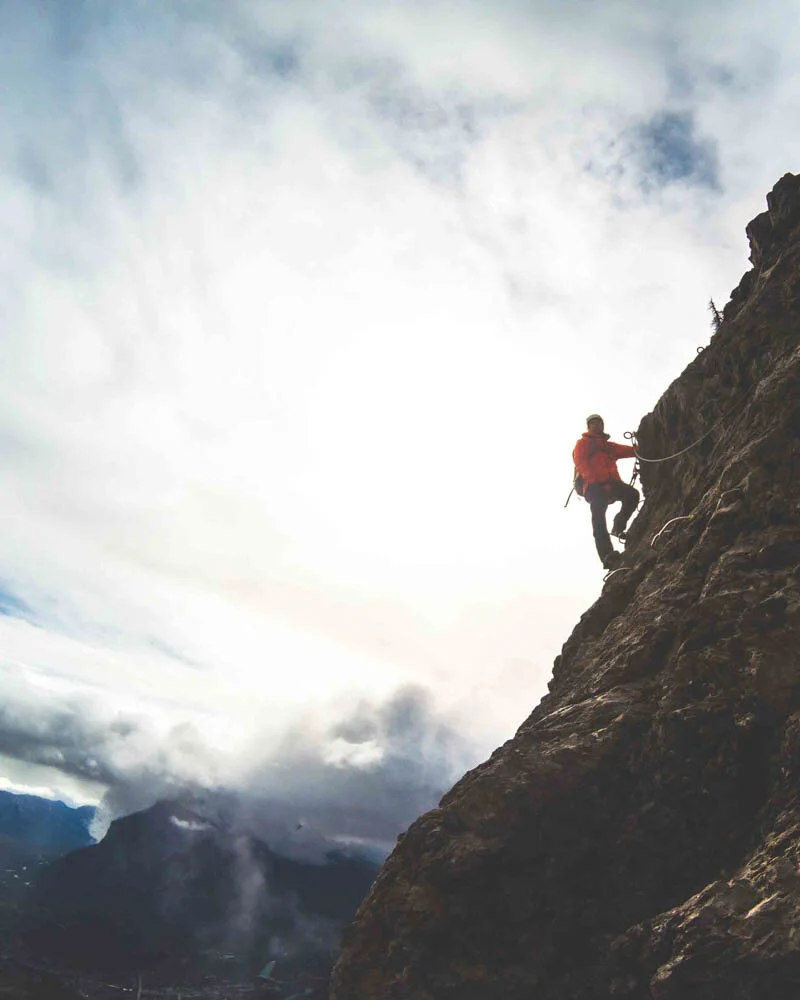
Via Ferrata Banff: climbing up Mount Norquay. The smile doesn’t tell the whole story…
What is a Via Ferrata?
Via Ferrata means “Iron Road” and originated in Italy. It’s a mix of hiking, scrambling and a little rock climbing. It’s the chance for hikers to try something a little more daring but with full safety gear so whilst it is usually on exposed mountains, you are always clipped in.

Via Ferrata Banff: What to expect
What is it like to hike the Via Ferrata Banff?
To start with there are four different routes you can take on for the Banff Via Ferrata according to how long you would like to hike for. We did the middle option, Ridge Walker which is a good choice if you’ve never done one before and don’t want to go all in on one of the longer routes.
You are provided with a harness, helmet and gloves, but they will also give you ankle boots with good grip and a backpack if you need it. For the hardest parts of the hike (and any section which involves the use of metal rungs and foot holds) you can clip onto a metal cable that is drilled into the rock which can comfortably hold your weight.
Before you head onto the trail you will be given the chance to practice on a little training wall with no exposure. Your guide will show you how to clip in and out and how to move across the trail before each person in the group does the same.
I’m not going to lie, I was already nervous at this point and felt my hands shaking along the easy practice section - not a great start! Joe and everyone else in the group found it easy, which left me feeling like I was definitely out of my depth.
Luckily our guide Shep asked if anyone was scared and after i fessed up took me under his wing.
Via Ferrata Banff: The Ridge Walker climb
The Via Ferrata in Banff also has a decent amount of hiking that doesns’t involve climbing or clipping onto a cable. This is something we didn’t expect, but it means that you aren’t climbing for the whole time (something that is reassuring if you’re nervous!).
On the whole, these sections are straightforward, but sometimes the path gets a little slippery or steep (which is only an issue on the way down).
You have so much time on each route that - whilst it is steep- you don’t actually need to be really fit, as you can take it slowly. I found having to use my upper body on sections a little tiring because I never actually use it normally, but other than that it is not too bad.
To put it in context on the Ridgewalker route you are given four hours to get round, whereas our guide can complete it in under 40 minutes! The route is actually only 1.4km in distance and 260m elevation gain.
Now for the route.

Via Ferrata Banff: The first climb
Via Ferrata Banff - Ridgewalker
Distance: 1.4km
Elevation: 260m
Time taken: 3.5 - 4 hours
You start by taking a chair lift part way up the mountain before practicing a run on the training wall, learning to clip in and off the cable (something you’ll do every few metres), climb on the rungs and traverse across a wall.
As I mentioned everyone in our group found this easy, but I was already letting my nerves get the better of me! The rock was a little wet and I’d borrowed hiking boots with better grip but that felt strange to me and it all added up to feeling well out of my comfort zone.
Still I was determined to make it and I’m so glad I pushed on.

Via Ferrata Banff: The swing bridge at the start
Read next: The best things to do in Banff
The trail starts with a uphill walk to the first wall. You clip in and traverse a rock wall to a suspension bridge. The suspension bridge was the easiest bit for me, it wobbles but it’s a lot of fun! From here the hardest part begins.
There’s a short stop, but essentially you’ll be climbing and traversing walls for quite a way, some of which are near vertical! You have a lot of time though, so you are always moving slowly (particularly if you’re me!) you don’t ever feel out of breath.

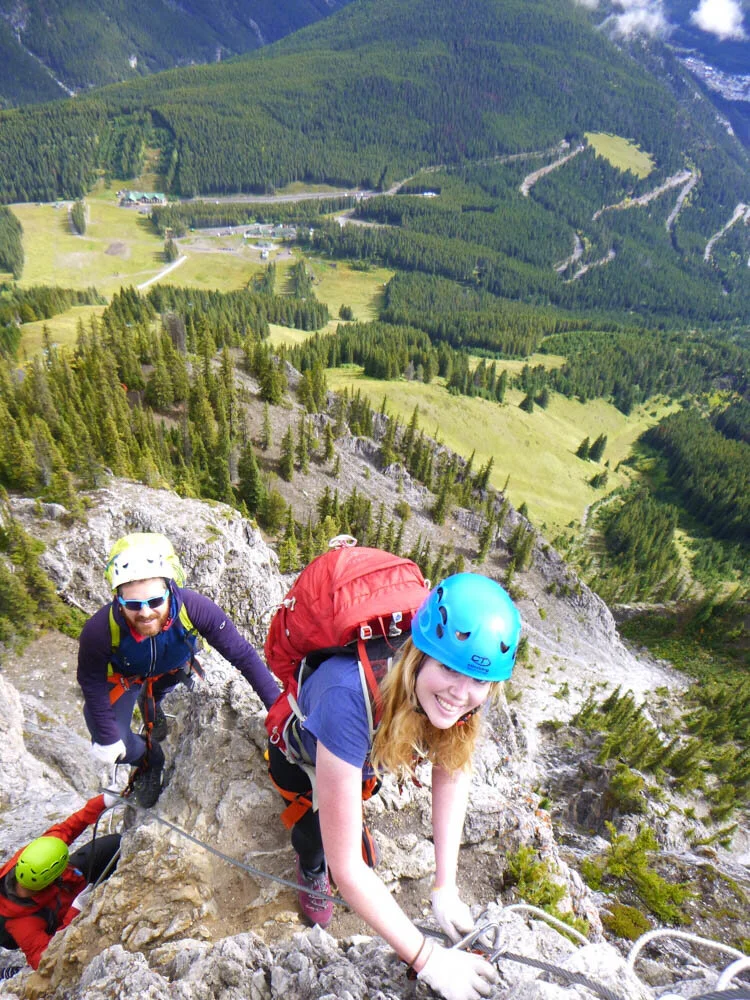
Via Ferrata Banff: Climbing up Mount Norquay

Via Ferrata Banff: Us climbing up!
Read next: The best hikes in Jasper
The scramble
The fun/nerves begin as you’ll be figuring out how to scramble up and along the rock. Whilst you are frequently on the edge, our guide did a really good job of helping everyone (namely me) out and showing us the best footholds and grips.
After a while I did begin to feel a bit more relaxed and actually quite enjoyed trying to figure out the best moves. There were still definitely freak out moments where I wondered what I was doing on the side of a mountain, but for the most part I gained a bit of confidence and actually managed to appreciate the views - which this being Banff were of course absolutely amazing!
Joe absolutely loved this section and didn’t find it scary or difficult and was already wondering which Via Ferrata to do next : )
After a bit more climbing you reach a rest point where you can unclip and relax because all the clip in metal rung climbing is done.

Via Ferrata Banff: the first rest stop

Via Ferrata Banff: Views from the climb
Read next: Banff vs Canmore - which is the best?
From here you can see down into Banff and the surrounding valley and for me this was already a big sense of achievement. It’s a beautiful view to break up the hike.
After a decent rest stop you then have a short hike to the summit which you don’t need to clip in for as it’s pretty straightforward. The views are even better from the top!

Via Ferrata Banff: The view from the top
Read more: Bucket list things to do in Lake Louise
The descent
Then begins the descent where you will start clipping in and out again. If you’re confident on steep downhill hiking this is going to be the easy bit for you but surprise, surprise, I found it a little difficult!
You’re always clipped in so it’s perfectly safe but it’s steep in places and can be a bit wearing on your knees!
You’ll have to be careful with your footing and take your time as there are sections where you are climbing down steep rock, followed by steep dirt paths.
Again, no one else found this difficult, can you see a trend emerging?

Via Ferrata Banff: Descending

Via Ferrata Banff: Going downhill
Still, I made it down with a little help from our guide and immediately felt a sense of satisfaction at having completed something that for me had been quite challenging. Nothing like facing your fears and winning!
Read more: 10 hikes in Revelstoke you want to do
Is the Via Ferrata for you?
Given I know how nervous I felt, I think most people can take on the Via Ferrata in Banff and get through with a little help from the guide (unless you suffer from severe vertigo). I’ve even considered taking on another one at some point. Maybe.
If you’re an adventure lover then it is definitely a must for your Banff itinerary.
Essential info about the Via Ferrata Banff
Via Ferrata Banff price
The Via Ferrata price varies according to which route you take. The Ridgewalker is $219 per person.
What to bring to the Via Ferrata Banff
You’ll want good grippy boots, a waterproof (even if the weather looks good, this is Banff!), a small backpack, water and some snacks. Special gloves and harnesses are provided and boots, backpacks and waterproof trousers are also provided for free if you need them.
Getting to Via Ferrata Banff
The Via Ferrata in Banff starts from the ski slopes at Mount Norquay which is a 15-20 minute drive from the centre of Banff. You’ll see signs for the Via Ferrata and you’ll need to check-in 30 minutes before you start.
Read next: Picturesque Tofino hikes in Vancouver Island
Where to stay in Banff
Luxury - The Fairmont Banff or Lake Louise
Both Fairmont options are grand and luxurious so where you stay depends on whether you want to be in town or out by Lake Louise (just over 40 minutes drive). If you can, staying in both areas would be great and when we return to the area we will stay at Lake Louise for at least part of our trip as we loved that whole area so much. These are bucket list hotels when you’re really looking to treat yourself and one day we’d love to stay.
The Fairmont hotels don’t come cheap but if you have the budget they do come highly recommended. Rooms look stunning and a blend between modern and old world style - think marble bathrooms. There are onsite pools and jacuzzi with spectacular views. A major downside of the Fairmont in Banff though is that parking is charged in addition to the room rate which we think is quite tight. That is not the case at Lake Louise.
Check the latest prices and availability for the Fairmont Banff Springs:
The Fairmont, Lake Louise
Check the latest prices and availability for the Fairmont Chateau Lake Louise:
Midrange - Ptarmigan Inn
This is where we stayed on our third visit to Banff and we loved the really central location, we could walk everywhere in town and having previously stayed in Canmore it was a treat to be so much closer to the lakes and other attractions surrounding Banff - when you’re heading to Moraine Lake for sunrise those extra 30 minutes in bed really count!
Our room wasn’t huge but it was big enough and very comfortable, the bed in fact was so comfy that sometimes it was hard to drag ourselves out! The bathroom was also great and I loved the local Rocky Mountain shower products. There is a free underground car park and also a pool and sauna which we sadly never had time to use!
Check the latest prices and availability on:
Our Via Ferrata was in partnership with Banff Lake Louise Tourism and Destination Canada. All opinions are - as always - our own.
This post may contain affiliate links, meaning at no additional cost to you, that we will earn a small commission if you click through and decide to make a purchase. This helps towards the costs of running our website. :-)
Like it? Pin it!

Follow us on social media
Would you take on the Via Ferrata Banff? What is the most unique kind of hike you’ve ever done? Let us know in the comments below!