

The Besseggen Ridge track is one of the best day hikes we have ever done. The scenery is breathtaking, with endless snow-capped mountains, glaciers and ice blue lakes. It’s simply jaw dropping. Every time we thought it couldn’t get any better, it did. Well for the first half anyway. The second half isn’t quite as majestic, but we’ll let it off for the sheer number of wows that the first half offers.
The hike does have a fair amount of elevation gain, rough terrain and one significant scramble. It’s not an easy walk, but it’s also not one of the harder ones by Norway standards!
The season is short, so if you’re keen to do this magnificent hike, then you need to time it right. All the details on that, plus exactly what to expect from the hike are in this guide.

Besseggen Ridge Hike
The stats
Distance: 16km circuit
Elevation gain 1,160m
Difficulty: Hard
Time taken: 6.5 hours
Which direction?
The Besseggen Ridge walk is a one-way trail that requires a ferry to shuttle you between Gjendesheim and Memrubu in Jotunheimen National Park. The easiest way to complete the hike is walking in an easterly direction from Memrubu to Gjendesheim, which is the route we took.
This involves getting a ferry at the start of the hike and walking back to the ferry port. This is the most popular route, but also the busiest because you’re starting your hike at the same time as a boat load of other people.

Going in the other direction (westerly) means you can start on foot and beat the crowds, taking the ferry back from Memrubu to Gjendesheim. It’s a more scenic route, but harder on the scramble.
Unless you are planning on camping, you will also have the pressure of getting to Memrubu in time for the final ferry, which might make it stressful. As the last ferry from Memrubu leaves in the afternoon, you’d have to start pretty early to make sure you have plenty of time.
The climbs, scramble and difficulty
We took 6.5 hours to complete the trail, which seemed to be about average. It’s worth bearing in mind that we do stop a lot to take photos, but I expect most people would on this trail!
The Besseggen Ridge track has five main climbs. Only one of these is a scramble, which I will go into in detail later in the post - as this is the bit I was worried about before starting the hike. The rest have decent paths and though steep, do not last that long.
The longest climb is the first one, when you have the most energy. The middle three are just small humps and the final one is the scramble. The trails are pretty good generally speaking, but there are long sections of rocky terrain, which can be a bit tedious to walk on.
In dry weather very few sections of the track were slippery, but much required watching your footing. I wouldn’t recommend this walk in the rain because the scramble would be very slippery and that could be potentially dangerous. It’s ideal if you can also pick a day with low wind as well.
The whole trail is exposed and the scramble in particular would feel quite hairy in high winds. You can check the wind speed here.
What to expect on the trail
The first climb
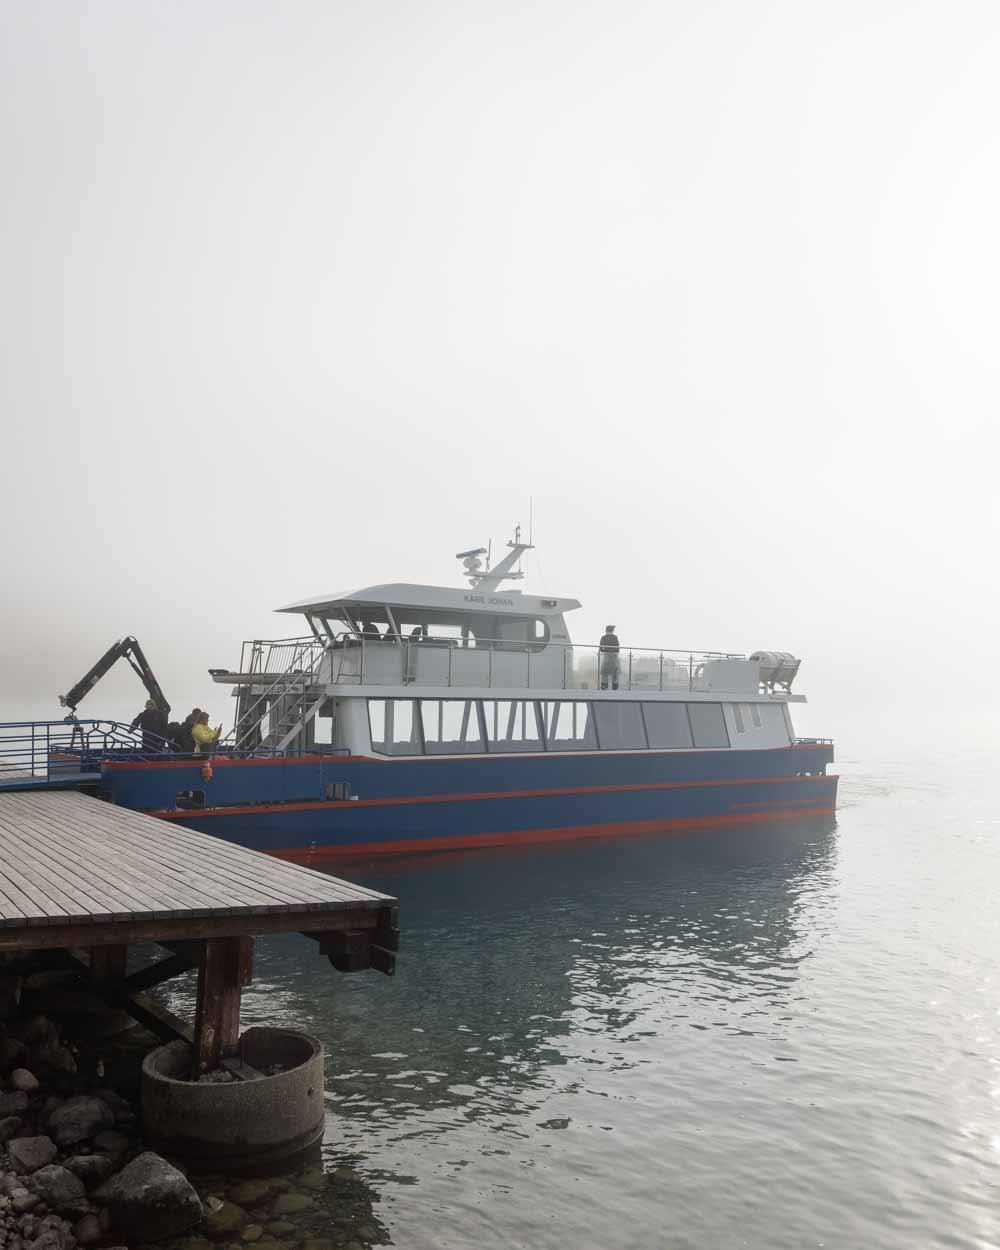
After a short ferry ride we disembarked at Gjendesheim. This is the last chance to use a toilet until you get to the end of the walk, but the queues really mount up.
I’d recommend just going on the ferry and skipping the queues.

In terms of directions, it’s excellently signposted throughout, with red ‘Ts’ painted on the rock. They are almost always easy to see (in good weather).

The season for this hike is also so small that you’ll no doubt be following a bunch of other hikers, so getting lost would be pretty hard!
We hung back partway up the first climb for at least half an hour, but even that didn’t separate us from everyone. A solitary hike this won’t be, but don’t let that put you off because it’s simply sensational.
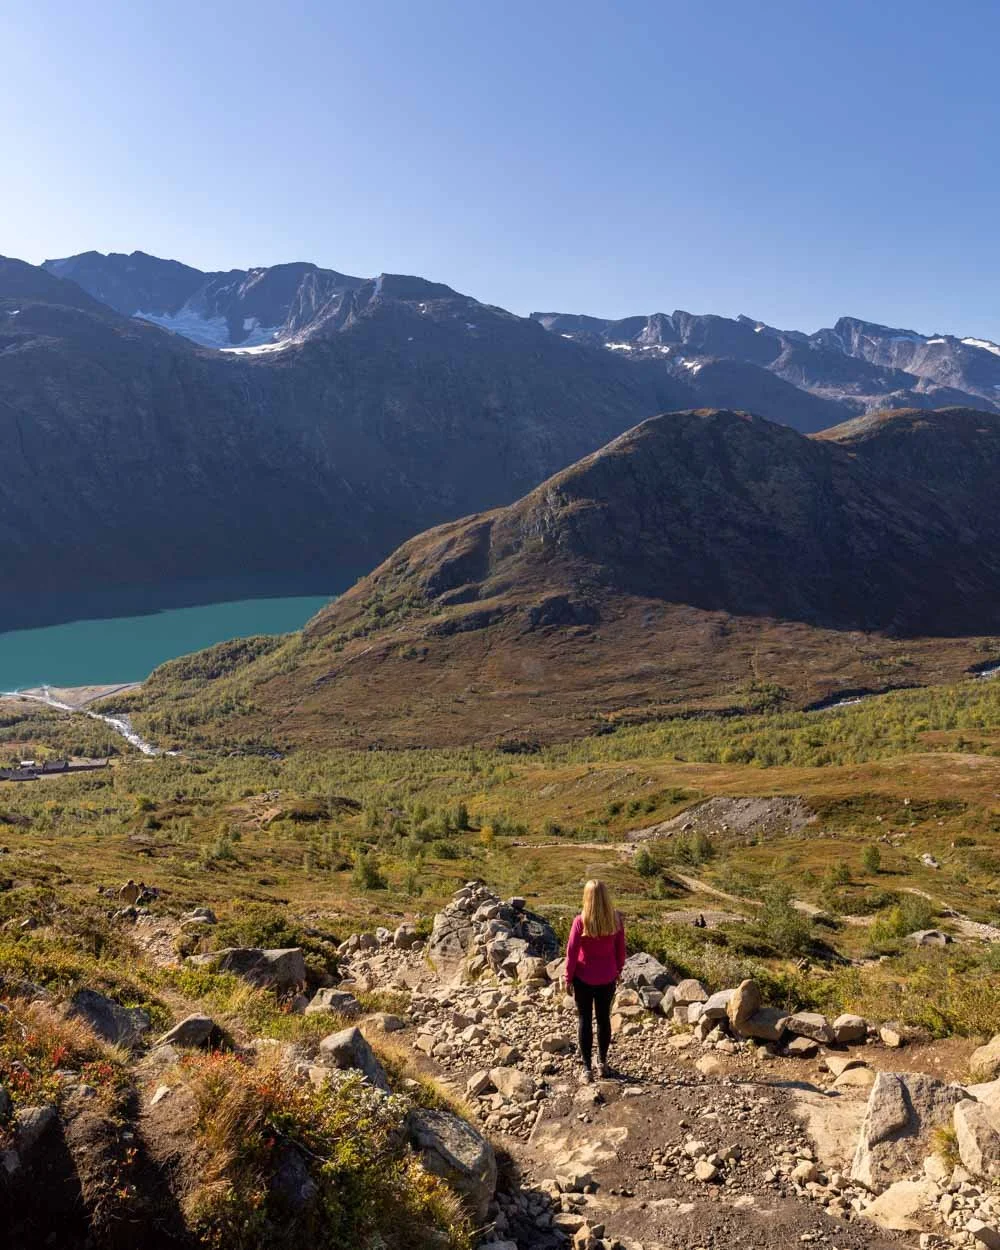
The start of the walk is a baptism of fire because it heads uphill almost immediately. Firstly through a little tree lined path before it fully opens up. The track is rocky, but not slippery when ascending.


It is pretty steep, but if you’re walking on a clear day the view behind you will be so exquisite that you’ll constantly be stopping to take a look.
If you have a good forecast, but it’s cloudy when you get there, don’t be too disappointed. Our ferry ride and the first bit of our hike were in thick fog.

We couldn’t understand how the forecast had been so wrong. But as the sun rose higher the fog cleared, first producing a magnificent cloud inversion and then it cleared completely.
Turning around and staring out at the mountains made for a truly memorable start to the walk.


The first climb lasts about 2km (you’ll reach the top 2.3km into the walk) and once you’re there, you’ve done the longest climb of all the whole track.
Around 1.5km of this is pretty steep, but then it eases significantly.

At the top you’ll see a marker which indicates how long the climb should have taken you (you’ll also find them at the top of the next few hills). They recommend you turn back if you’ve been longer than that time, but this would be unlikely as the times are generous.
In terms of views along this first stretch, not only do you have the snow-capped mountains, but also a sublime turquoise lake.
As you continue, you’ll also pass a jagged ridge, second lake and glaciers! Honestly, it’s pretty mind blowing!

The second climb
The next three climbs are all fairly small humps. There’s around 500m of track which feels almost flat before you reach the first hump.

This climb lasts just 650m and is much easier than the first one. The track is in good condition and offers a great view of the spiny ridge of Knutshøe - another hike we’d love to do one day.

The scenery is gorgeous along this stretch, with mountains, glaciers and a deep blue lake, but the best is yet to come.
Once you’ve climbed this small hump you have a 400m descent. The gravel path was great and I didn’t find it in anyway slippery, which was a relief as I knew there were several descents to come!

The third climb
You have a 150m break on flat track before the next climb begins. It might not sound like much, but the previous climb was so small that you feel like you’re making good progress as you move onto the third one.
This climb is even shorter at just 550m and again the track is good and not overly steep.

You’ll have distant views of two lakes and the surrounding mountains, but nothing could prepare you for the view from the top.
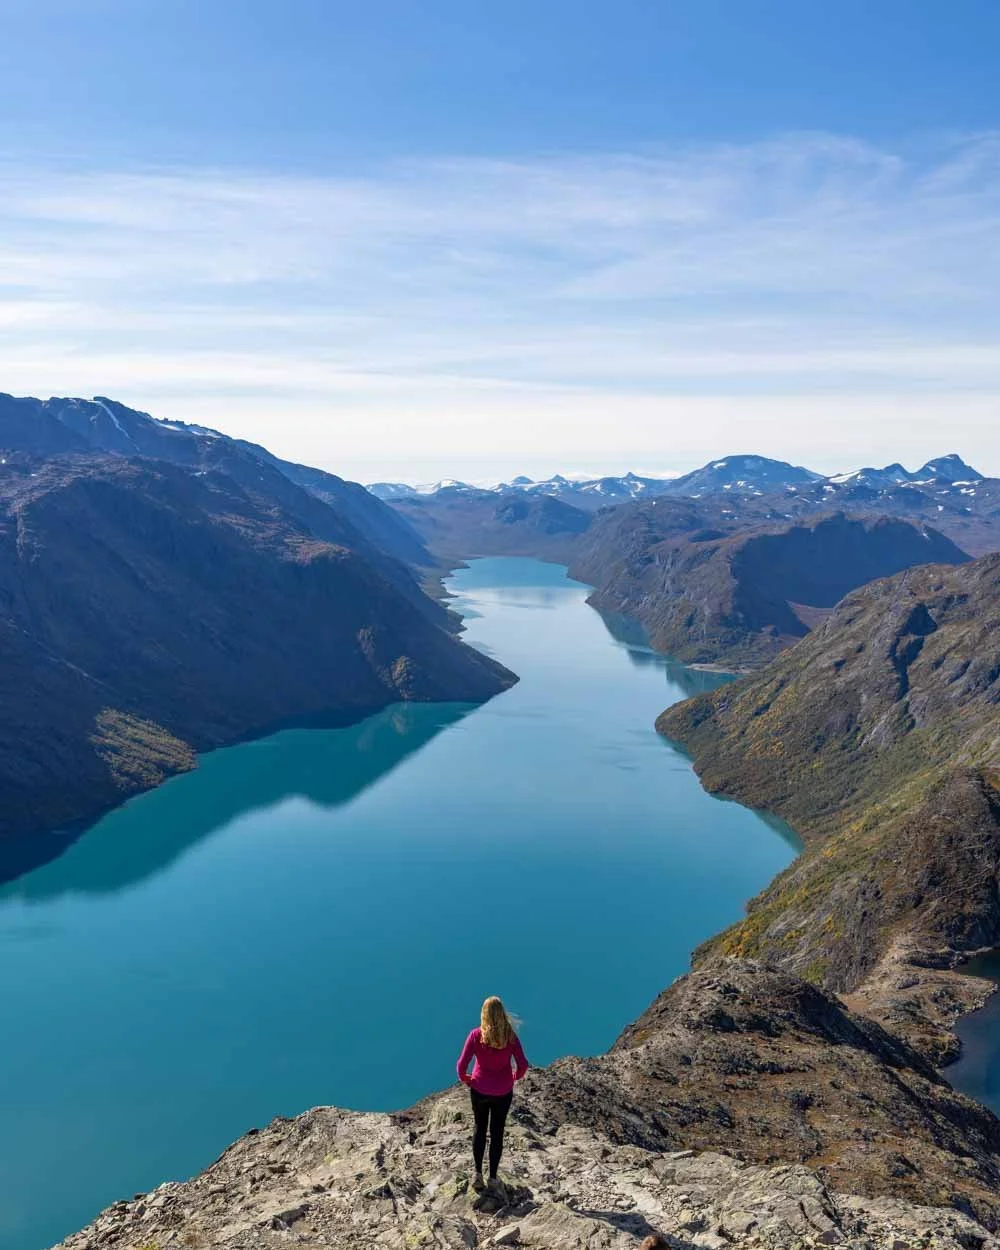
You see another gorgeous lake, but as you begin walking along the ridge, you’ll see what’s on the other side. The views are truly unbelievable.

No photos or description could do the turquoise lake - Lake Gjende - surrounded by steep mountains justice. It was just wow.
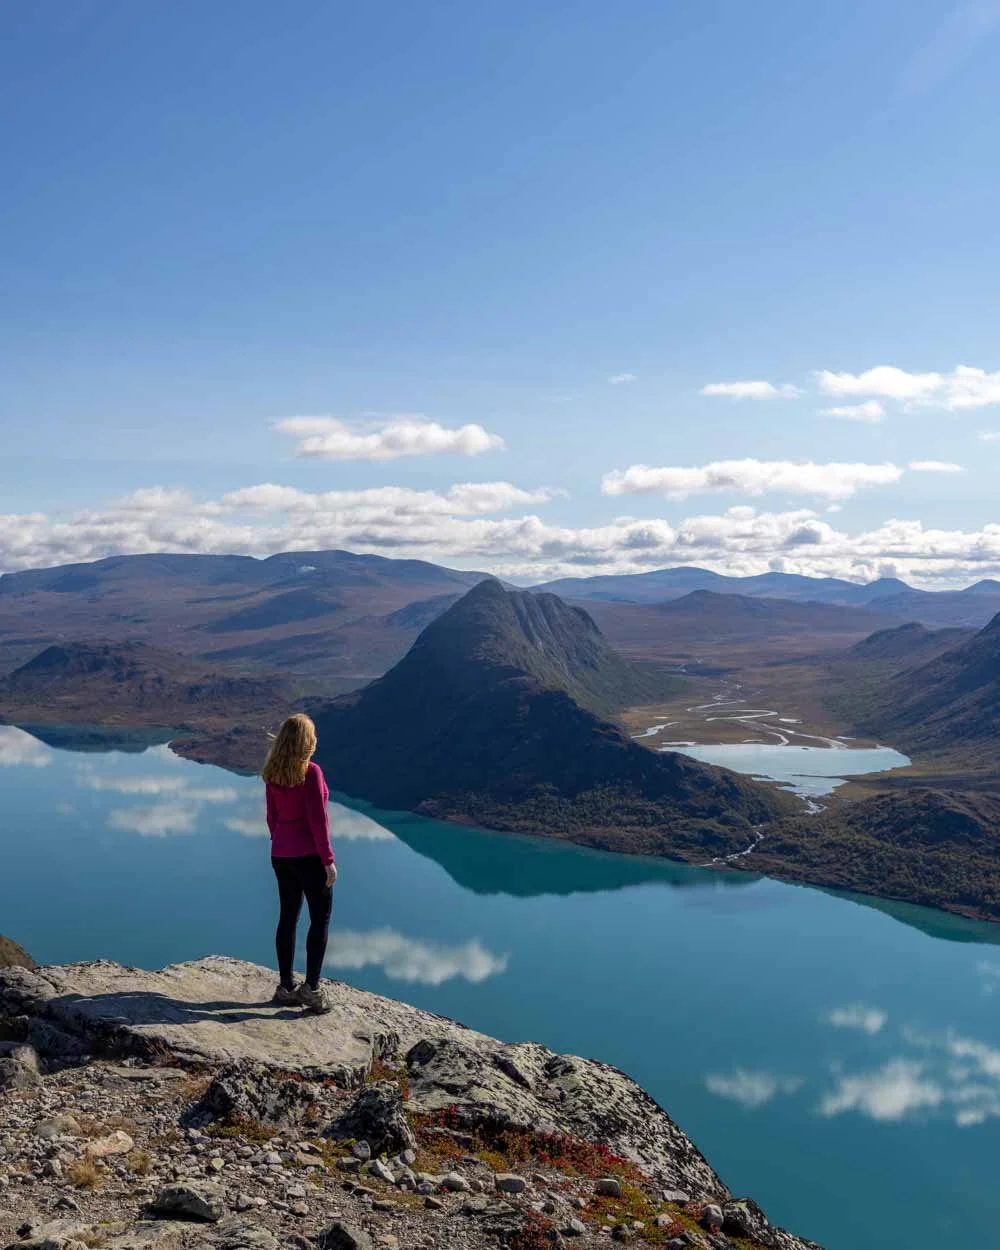
The next few hundred metres traverse the ridge on a good wide track and the views on both sides are tremendous.
It was my favourite stretch of the hike and one of my favourite stretches of any hike I’ve ever done. I didn’t want it to end! The descent from the ridge is rocky in places, but nothing difficult.


The fourth climb
The fourth climb lasts for 850m, but there’s a little downhill and flat patch within it. Again it’s not too steep or challenging.
There’s an easy stream crossing a couple of hundred metres into the climb. It’s a mix of gravel path and rocky sections, but nothing slippery.

The scenery is still great, but you feel further from the turquoise lake, so it’s not as amazing as from the ridge.
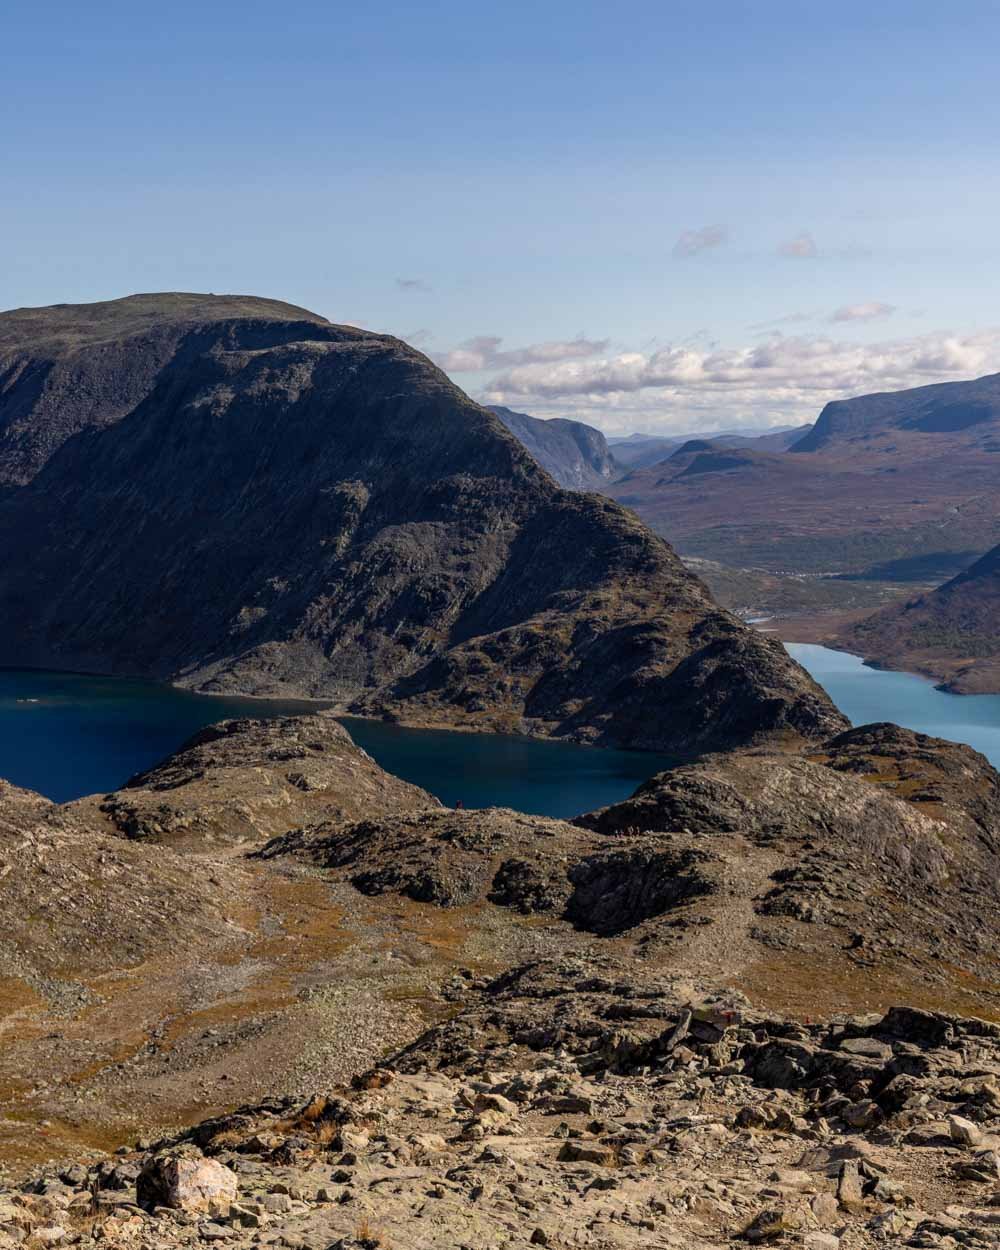
On the way up, make sure you turn around to see the view of the two lakes next to each other - you’ll see another version of this view from higher up at the top of the scramble, but it’s still impressive at this point.

Once you reach the top you’ll see the spine of the scramble ahead of you. It still looks quite far away and also pretty steep!
You can see from here it’s divided into two sections. One is easy and doesn’t really require the use of your hands, the second is a proper scramble, but more on that in the next section.
The descent from the fourth climb is quite long, much more so than any other so far at around 1.2km. The path is decent at first, but there is about 200m which is more of a boulder scramble.
It’s not difficult, but does require more careful footing.


After that the descent becomes much more gentle as you head towards the lakeshore, which you’ll reach roughly 7.4km into the walk.
If you love wild swimming then bring your swimsuit because the water in the lake is crystal clear and utterly stunning. I was so sad that I didn’t think to bring mine!

Just before you reach the lakeshore you’ll see a junction. The trail marker points you left towards the lake, but we saw people heading right, up the rocky path.
It turns out the rocky path is the old route and much trickier. We’d recommend heading to the lakeshore and following the good path around the water’s edge.


The scramble part one - the easy bit
From the lakeshore to the start of climb number five, it’s just under 400m (7.8km into the walk). The first 700m of the climb are quite easy and I only needed to use my hands once.
You are walking upright and though there is no formed path, it’s on good grippy rocks and easy enough.

It’s steep, but there are many points you can stop. As I was climbing I remember thinking that I had worried about the scramble for nothing! It felt very straightforward and perfectly safe.

However, after 700m I saw the second part of the climb. It looked very intimidating. I sat on a rock for far too long and in that time almost convinced myself I couldn’t do it.
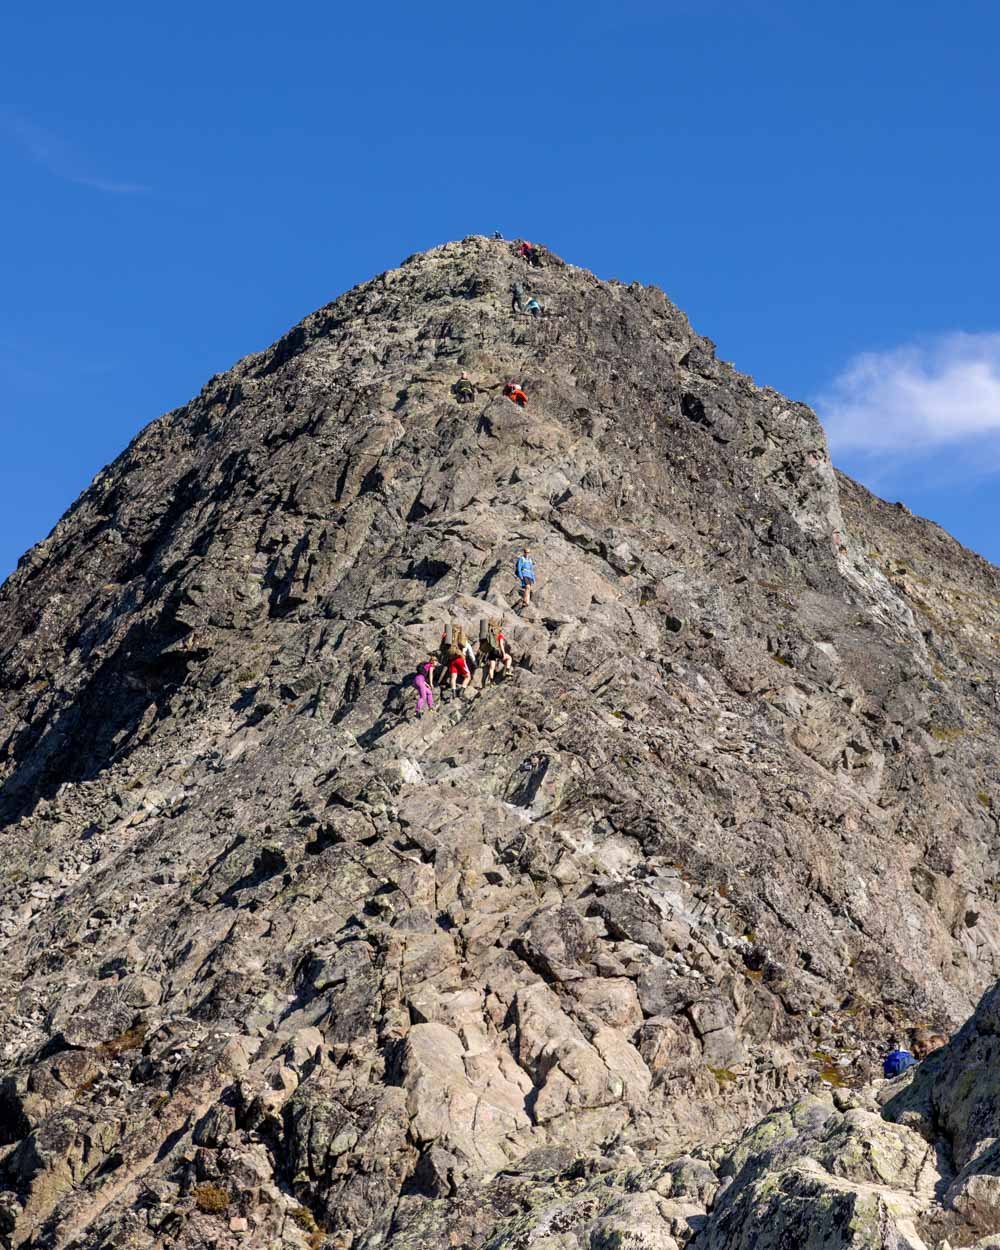
I told myself that the reason people were stopping on the way up was because they had got nervous about the exposure. It looked almost vertical and like there would be no way to stop once you started. I was panicking that I might get nervous part way up and freeze.
We’d seen a sign at the bottom of the climb, close to the lake, that said there was an alternative route which followed the lakeshore and added on 4km, but avoided the scramble.
At this point it sounded tempting. Luckily, I decided to give the scramble a go and it turned out to be the best decision, and has given me so much extra confidence.

The scramble part two - the harder bit
The steeper scramble lasts for 400m, with the first 200m being the steepest. Contrary to how it looks from below, there are multiple places you can stop on the scramble that are not exposed and feel perfectly secure.

I am going to describe this from the point of view of someone who hikes a lot, but is not very experienced or confident with scrambling.
In UK terms this is a grade one scramble (the easiest grade), but if you aren’t used to it, you may still find it intimidating.
I’d say it was roughly 50:50 on the people we met as to who felt confident and who was nervous.

The first bit of the scramble is the steepest and most exposed, but the rock is very grippy and there are many, many hand and foot holds.
You don’t need to do any kind of manoeuvres, it’s all straightforward climbing. At the beginning the use of hands is definitely required, but not all the way.

The first section of climbing
There are trail markers as you go, but I also found there were multiple other routes you could take which were also straightforward.
A couple of times I looked back and felt it was a bit exposed, but in honesty never as exposed as it looks from below. If you are nervous it’s better not to look back and just keep going, only looking at the rock ahead.

I wouldn’t take on this section in wet or windy conditions, but in good conditions it was easier than I’d built it up to be - whilst still being enough of a challenge that I felt elated at the top.
After 400m you will reach a wide area which acts as an unofficial viewpoint, and what a view!

It’s a wonderful spot to sit and take it all in and get some great photos of Lake Gjende before you move on - as the best of the views are now behind you.

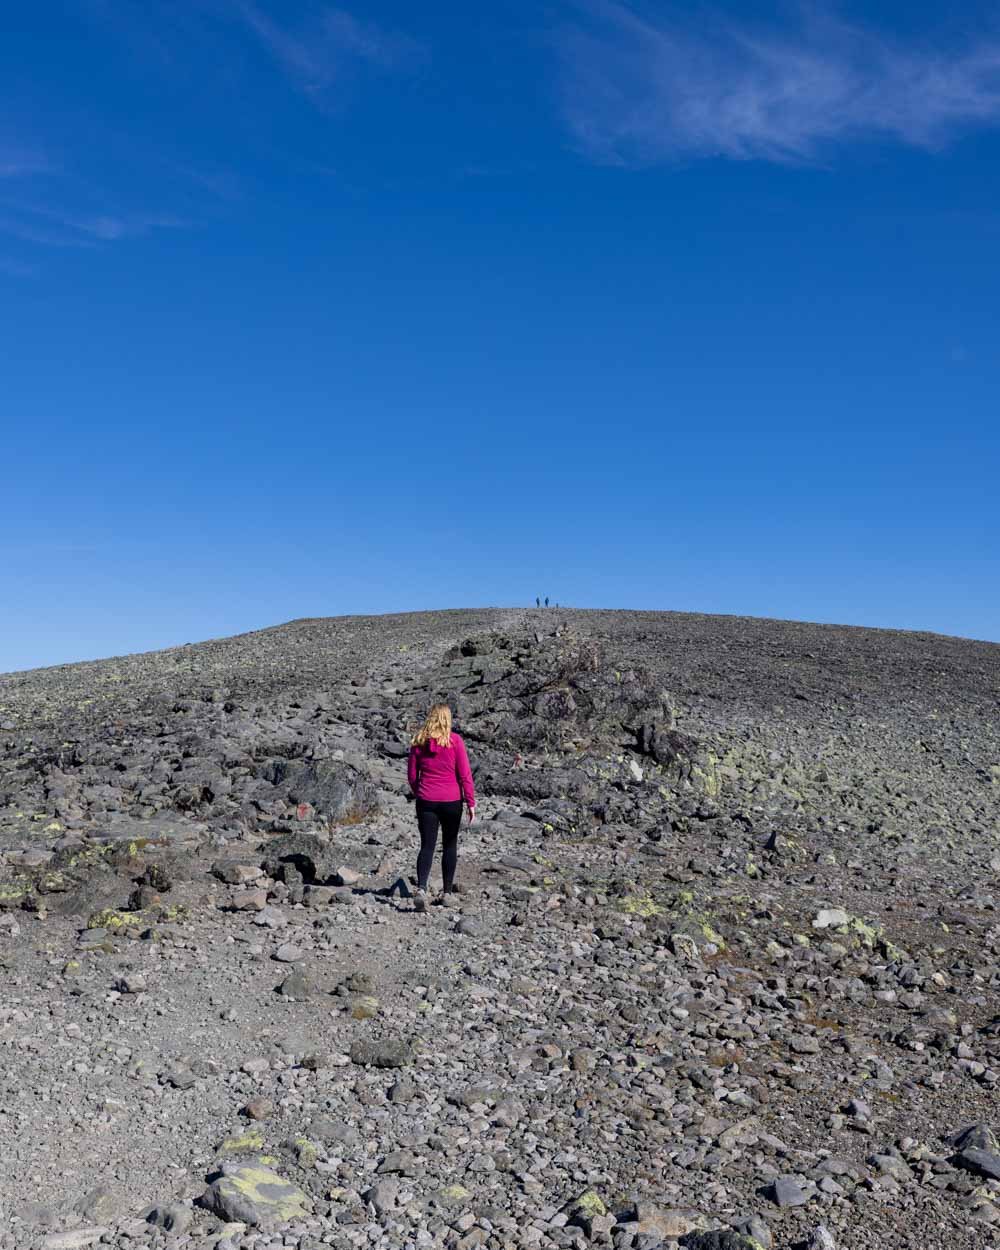
The tedious bit
At this point I thought all the climbing was behind us, but there’s a little more to go. After a brief descent you’ll begin heading uphill for a short time. Only 300m of it feels like a hill and then it becomes very gradual.

Unfortunately the terrain is rubbly underfoot, so it’s not very comfortable and if I’m honest, it’s a bit tedious. The views aren’t as good as you’re mainly looking out over a mini boulder field.
However, it’s less than 1km before you reach the huge cairn and the high point of the track. From here it’s downhill all the way

The descent
From the giant cairn you have a nice relaxing flat bit of track for the next 1.4km.

The views start getting lovely again, although nothing can compare to the dramatic scenery of the first 9km - but honestly that’s a tough bar and it’s still fabulous by any other standards.
After the flat section, the descent begins. I’d say approximately half the descent is easy and on a good path that you can move quite quickly on.
The other half involves rocky terrain including some descending on boulders. None of it was slippery as it was dry, but it did require careful footing.


There is one tiny section with a chain because the rock is wet. I went down in crouch mode and that was straightforward enough, the chain gives you that feeling of security and it really doesn’t last long.

You’ll start to get views of the ferry terminal which looks pretty far away for a while, but it’s gratifying to see it get closer and closer.

The last part of the walk is on a good path, which includes some stairs and you can make quick work of it.
I’d say it can feel a bit hard on the knees and a little tiring because it’s over 3km of fairly steep descending, but it feels amazing to look back on where you came from. The ridge looks incredible along the second half of the descent.

Once you reach the terminal there’s a small kiosk selling drinks and snacks and some picnic tables where you can sit and wait for the bus.
All in all, this hike is one of the best day walks we’ve ever done and should definitely go on your Norway bucket list!
Besseggen Ridge hike transport logistics
To hike the easier route as we did requires using a ferry and a shuttle bus from the car park, which is 1.7km from the ferry. You cannot park by the ferry if staying for more than two hours, so you must use the long stay car park.
The car park costs 150 NOK (just under USD $15). The shuttle bus is included in the parking fee and leaves at least every half an hour. You must be on the bus that leaves 30 minutes before your ferry at the latest. In our experience the people at the car park and running the shuttle bus were lovely. We were running late and they waited for us very happily as we organised ourselves and bought our ticket.
The ferry costs 200 NOK (approx USD $19) per person one way - but you only need one way as you’re walking back. If you’re hiking in peak season (July - August) we recommend booking in advance. We walked in September and booked on the day without issue, but we’ve heard it can sell out in summer. The ferry journey takes just under 30 minutes. I am sure it’s scenic, but we wouldn’t know as the fog created a total white out.
The hiking season for Besseggen Ridge
Generally the hiking season is when the ferry operates and there is less snow on the ridge. This is usually mid June to early/mid October. The ferry is daily until mid September and then it only operates on weekends. Outside of this time there will not be a boat and the ridge can be covered in snow and ice.
If you can, I think the best time to hike is September. Our ferry was less than half full and even that felt busy on the trail! September can still offer beautiful weather and also greater flexibility to pick your weather window as you won’t have to book the ferry in advance.
Getting to the trail head in Jotunheimen National Park
The road into the park is sealed all the way and in excellent condition. It takes around 4 hours 40 to get to from Oslo and 8 hours from Bergen. You will need to stay somewhere in the park or nearby the night before. We stayed in Lom, which is a 1.5 hour journey, but you can stay much much closer, including a trekking hut right by the ferry terminal.
The Bessheim Mountain Lodge and Cabins are also just down the road. If you want a range of options and a town for amenities you could try Beitostølen, which is a 35 minute drive away.
Where to stay
Stølstunet Leiligheter
The Stølstunet Leiligheter is all about the location and the views over the mountains. Based in the centre of Beitostølen, you’re about 30 minutes away from the trailhead at Gjendesheim and very close to supermarkets and restaurants in the town.
The apartments are comfortable, cosy and well equipped for anyone planning on making their own meals. This one is also a great option for larger groups as the apartments come in options from 2-4 bedrooms, with the 4 bedroom apartments being great value at 5,995 NOK per night ($191 USD) when we looked in peak season.
Tinden Grendehytte
Tinden Grendehytte is a great chalet that is modern and well equipped. It’s a cosy and warm space to retreat to after a day in Jotunheimen and we love the fact you can also unwind in a sauna! It’s another apartment that becomes good value for groups, but we didn’t think it was too bad a price for any number of people.
Tinden Grendehytte is located two minutes out of Beitostølen, which means you’re still really close to the amenities in town, as well as the trailhead for the walk.
Radisson Blu Resort, Beitostølen
The Radisson Blu is the best hotel option near the Besseggen Ridge. The rooms here are modern, nicely styled and have comfy beds for you to rest up on after doing the trail. Each room includes breakfast, so you can have a leisurely start to the day.
It’s in the middle of Beitostølen, so it’s in a great location, and it also has free parking.
This post may contain affiliate links, meaning at no additional cost to you, that we will earn a small commission if you click through and decide to make a purchase. This helps towards the costs of running our website. Thanks for your support.


